***Disclaimer: I am still perfecting this recipe. Feel free to use it and make it your own. It is very important to make sure the layer of chicken for the crust is very thin.
One thing I have missed since losing weight is pizza. It is so hard to make sure you have a pizza that matches nutritional needs after surgery or really, to maintain any weight loss. This is a way to have pizza and still get the high protein and low carb needed. Keep in mind, we do not have a full-sized oven where we live. We have a large toaster oven. This works fine for most of our needs, but if you are cooking in a full-sized oven with a regular sized sheet pan, you may need to up the amounts on the ingredients listed.
Ingredients:
Crust:
1-2 boneless, skinless chicken breasts
1/3-1/2 cup grated parmesan
1/2 tsp. dried oregano
1/2 tsp. dried rosemary
1/2 tsp. salt
pinch of black pepper
Topping:
Favorite tomato sauce (Sometimes I make my own, sometimes I buy carefully)
1/4 cup parmesan
Sprinkle of chopped basil
Mozzerella
Favorite pizza toppings
Directions:
Preheat oven to 450°F. Add all of the ingredients for the crust to a food processor. Blend until mixed well. Line a baking sheet with parchment paper. Add pizza crust spread very thin. The thin crust is key. The crust will thicken some as it cooks and to get the crust to be a similar consistency to regular pizza, it must be pretty thin. Bake in the oven for 15 minutes, or until the edges have browned and the chicken has cooked through.
Add ingredients for the toppings starting with the sauce. You can put whatever toppings you like. I prefer cheese or pineapple. J prefers bacon. We made a half cheese, half bacon pizza. Back in the oven with the toppings for 5-8 minutes, or until the cheese is bubbly and starting to golden.
Remove from the oven, slice, and enjoy after cooling for a few minutes.
Showing posts with label Soy Free. Show all posts
Showing posts with label Soy Free. Show all posts
Monday, April 20, 2020

Monday, April 6, 2020
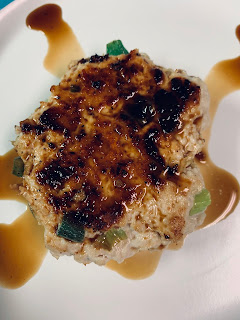
Teriyaki Burgers
Well, things in our world are very crazy right now. Big changes have happened for our little family at the same time and things have not gone as planned at all. My husband and I have both found ourselves without our regular jobs during this COVID-19 craziness. I really don't have another word for the current situation. I am still working but inconsistently. My husband is not working at all. Tough times...
However, I am lucky enough to have a decently stocked kitchen since I am normally a bit of a "prepper" when it comes to the freezer and pantry. With the changes I have had since surgery, I am still working hard to be healthy and continue to lose some weight. I have now lost 97 pounds, over 50 inches, and 5-6 sizes depending on the fit of the clothes. I am no longer on the obesity charts, no longer prediabetic, no longer have high blood pressure, and no longer in plus size clothing. Some think that surgery is the easy way out, but it is not. I have still had to do a lot of work and after years of medical issues, it was truly a life saver.
I made this burgers with ground turkey. However, in the future, I believe I will use other meat such as pork or bison. I just don't care for the texture of ground turkey. You could also put these on a bun like a burger but we did not. I am very careful with carbs and usually prefer to get better carbs from other sources.
Friends often ask if they can leave something out... Of course you can. Some things need a substitution but some don't. If you don't like onions, leave them out and add flavor with something else... more garlic and ginger perhaps. If you don't like ginger, leave it out. If you don't like ground turkey, use pork, chicken, bison, or whatever is your favorite ground meat.
Ingredients:
1 lb. lean ground turkey (or any lean meat)
1/4 cup scallions
2 cloves garlic, minced
1 tsp. fresh grated ginger
1/4 cup coconut aminos (you can use soy sauce but I don't do soy)
1/4 cup chicken stock
1 Tbsp. rice wine vinegar
1 small chopped onion
1/4 tsp. sesame oil
salt and pepper
olive oil spray
Directions:
Combine turkey, scallions, garlic, ginger, and pepper in a bowl. Divide mixture into patties. If you are putting this on a bun, make 4 patties. If not, you can make the patties smaller if you like. Spray the bottom of a skillet with the olive oil. Cook the burgers until cooked through on medium/medium-high heat. Remove burgers from pan. You can keep the burgers in the oven to stay warm or tent with foil. Pour chicken stock, coconut aminos, vinegar, and onions to the hot pan. Simmer until onions are soft. Stir in sesame oil and serve over the burger patties.
However, I am lucky enough to have a decently stocked kitchen since I am normally a bit of a "prepper" when it comes to the freezer and pantry. With the changes I have had since surgery, I am still working hard to be healthy and continue to lose some weight. I have now lost 97 pounds, over 50 inches, and 5-6 sizes depending on the fit of the clothes. I am no longer on the obesity charts, no longer prediabetic, no longer have high blood pressure, and no longer in plus size clothing. Some think that surgery is the easy way out, but it is not. I have still had to do a lot of work and after years of medical issues, it was truly a life saver.
I made this burgers with ground turkey. However, in the future, I believe I will use other meat such as pork or bison. I just don't care for the texture of ground turkey. You could also put these on a bun like a burger but we did not. I am very careful with carbs and usually prefer to get better carbs from other sources.
Friends often ask if they can leave something out... Of course you can. Some things need a substitution but some don't. If you don't like onions, leave them out and add flavor with something else... more garlic and ginger perhaps. If you don't like ginger, leave it out. If you don't like ground turkey, use pork, chicken, bison, or whatever is your favorite ground meat.
Ingredients:
1 lb. lean ground turkey (or any lean meat)
1/4 cup scallions
2 cloves garlic, minced
1 tsp. fresh grated ginger
1/4 cup coconut aminos (you can use soy sauce but I don't do soy)
1/4 cup chicken stock
1 Tbsp. rice wine vinegar
1 small chopped onion
1/4 tsp. sesame oil
salt and pepper
olive oil spray
Directions:
Combine turkey, scallions, garlic, ginger, and pepper in a bowl. Divide mixture into patties. If you are putting this on a bun, make 4 patties. If not, you can make the patties smaller if you like. Spray the bottom of a skillet with the olive oil. Cook the burgers until cooked through on medium/medium-high heat. Remove burgers from pan. You can keep the burgers in the oven to stay warm or tent with foil. Pour chicken stock, coconut aminos, vinegar, and onions to the hot pan. Simmer until onions are soft. Stir in sesame oil and serve over the burger patties.

Thursday, July 6, 2017
Slow Cooker Garlic Chicken
I tried a new recipe this week. It was a win after a few modifications. I made slow cooker garlic chicken and paired it with couscous and green beans. Green beans are our favorite vegetable around here. This was the first time I tried couscous. It wasn't too bad but a little goes a long way. I also cooked it a little differently than the package directed. I don't like my pasta or rice to bite back. I found this recipe here, but I modified it quite a bit for our family needs and personal tastes. I am including two recipes. One is for the garlic chicken and one is for the couscous.

Slow Cooker Garlic Chicken
Ingredients:
4 boneless, skinless chicken breasts
1-2 Tbsp. favorite cooking oil
1 medium onion
3 garlic cloves
2 tsp. dried thyme
3 cups chicken stock
1 cup flour
salt and pepper
Directions:
-In the bottom of the slow cooker, add oil, thyme, onion and garlic. Take the chicken breasts and roll in the mixture at the bottom of the cooker. Add salt and pepper. Lay chicken in a layer in the bottom of the cooker.
-In a bowl, whisk/blend together chicken stock and flour. Make sure to mix until smooth with no clumps. Pour the mixture on top of the chicken in the slow cooker. Cook on high for 4 hours or low for 8 hours. We always shred our chicken up when it is done but you can keep it whole if you would like.
Couscous
Ingredients:
1 cup dry couscous
2 cups water
salt
Directions:
Bring water and salt to a boil. Add couscous to boiling water while constantly stirring. This process will only take a couple of minutes and the couscous is done. As soon as the water is soaked up, remove from heat. Stir and fluff with a fork (much like rice) right before serving.
We made this into 4 meals but it was WAY too much and there was a lot of waste. None of us could eat an entire serving. Next time, I will be dividing it into 6-8 meals. It is great leftover!

Slow Cooker Garlic Chicken
Ingredients:
4 boneless, skinless chicken breasts
1-2 Tbsp. favorite cooking oil
1 medium onion
3 garlic cloves
2 tsp. dried thyme
3 cups chicken stock
1 cup flour
salt and pepper
Directions:
-In the bottom of the slow cooker, add oil, thyme, onion and garlic. Take the chicken breasts and roll in the mixture at the bottom of the cooker. Add salt and pepper. Lay chicken in a layer in the bottom of the cooker.
-In a bowl, whisk/blend together chicken stock and flour. Make sure to mix until smooth with no clumps. Pour the mixture on top of the chicken in the slow cooker. Cook on high for 4 hours or low for 8 hours. We always shred our chicken up when it is done but you can keep it whole if you would like.
Couscous
Ingredients:
1 cup dry couscous
2 cups water
salt
Directions:
Bring water and salt to a boil. Add couscous to boiling water while constantly stirring. This process will only take a couple of minutes and the couscous is done. As soon as the water is soaked up, remove from heat. Stir and fluff with a fork (much like rice) right before serving.
We made this into 4 meals but it was WAY too much and there was a lot of waste. None of us could eat an entire serving. Next time, I will be dividing it into 6-8 meals. It is great leftover!
Saturday, June 4, 2016
Homemade Lemonade and Lemonade Syrup
Two posts in one day! What?! Well, it's rainy and yucky outside. I haven't even been able to open my pool yet. It's criminal! Already four days into June and I can't open my pool! So, I'm on my computer pulling new recipes and watching L play with her toys. The house is a wreck because she is bored. She has pulled out toys from the deepest corners of her toy boxes. This is a child who does not enjoy just sitting and playing video games like other kids. She is always on the go go go... She did mention wanting to try lemonade though. L? Wants to try something new? No way! So I went and bought some lemons. She, of course, cannot just have the lemonade at the store. I have to make it from scratch. But I already learned how to do this long ago. So, this morning we squeezed lemons. She thought that was really cool. She only wanted to juice one though. She didn't want to touch the "dirty seeds." My sensory child... They were slimy from the juice and pulp. But she did sit and watch. It was a good experience for her. So now I will share the experience with you. :)
And guess what... I remembered pictures this time!!!

Ingredients:
1 cup fresh squeezed lemon juice (I squeezed about 6 medium lemons for this this morning)
1/2 cup water
1 cup raw organic sugar
Directions:
In a small/medium saucepan, bring lemon juice and water to a boil. Whisk in sugar. Make sure you are using non reactive cookware. I used a silicon coated whisk. Pour into a jar and let cool. Refrigerate syrup in jar for up to one month.
To make this into lemonade, stir 1 Tablespoon (per 8 oz.) of syrup into a cold glass of water. Adjust to taste of course. I find that two tablespoons of syrup in one of my larger glasses of ice water is perfect.

And guess what... I remembered pictures this time!!!

Lemonade Syrup
Ingredients:
1 cup fresh squeezed lemon juice (I squeezed about 6 medium lemons for this this morning)
1/2 cup water
1 cup raw organic sugar
Directions:
In a small/medium saucepan, bring lemon juice and water to a boil. Whisk in sugar. Make sure you are using non reactive cookware. I used a silicon coated whisk. Pour into a jar and let cool. Refrigerate syrup in jar for up to one month.
To make this into lemonade, stir 1 Tablespoon (per 8 oz.) of syrup into a cold glass of water. Adjust to taste of course. I find that two tablespoons of syrup in one of my larger glasses of ice water is perfect.
This is what my jar of syrup looks like:

Monday, July 14, 2014
Canned Green Beans
As my previous post mentioned, I've been canning and freezing several fresh vegetables this summer. The last post was instructions for canning diced tomatoes. This one is for canning green beans. My picky family will almost always eat green beans. There are so many ways you can season green beans to make them work with your meal flavors. We like to experiment with them.
Just a note: You will need a pressure canner for green beans. I have a pressure canner which doubles and does water bath as well. If you are truly interested in canning and preserving at home, then it is worth buying one. They aren't very expensive anymore but they are big so you have to have a decent place to store them. Now, on to the good stuff.
Ingredients:
Green beans
Water
Salt
Directions:
Break the ends off of the green beans and snap the beans into 1-2 inch pieces. Rinse the beans. I have a wonderful large, wire strainer that sits on the sink top. I set it on the counter and snapped the bean pieces directly into it so it would be easier to rinse them after.
Now it is time to sanitize the jars and lids. Boil water in a pot to sanitize the bottles and boil water in the canner to sanitize the lids. Just pour the boiling water into the jars to sanitize and pour it back out when you are ready to put green beans in the jars. Toss the lids into the canner when the water is boiling to sanitize them. Remove them after they are in for a few minutes.
In the large pot, boil water to add to the jars after the green beans have been added.
Use the directions for your pressure canner to add the correct amount of water to the canner. Mine calls for 3 quarts and has a fill line inside the pot. Bring the water to a boil.
Add green beans to the sanitized jars. Be sure to leave at least a 1/2 inch of head space. I usually just fill them up to the threaded part at the top of the jar. Add 1 tsp. of salt to each jar. Add boiling water to each jar. Again, only filling up to the threads.
Use a small rubber spatula to remove the air bubbles from the jars.
Wipe the jar rim of any water and salt. Any of this left on the rim could prevent a proper seal. Place a lid on each jar and tighten. Do not tighten too much at this point but tighten enough so that no water can seep through.
Place the jars into the pressure canner. Place the lid on the pressure canner and lock down. Use the 10 pound pressure weight for canning green beans unless you live in a high altitude. Once the weight starts to jiggle, cook for 25 minutes.
I won't give you complete directions on what to do for pressure canning because it is easier and safer to use the directions from your canner. The time and pressure weight is the information you need for green beans. For pressure canning, use the instructions from your canner.
When the timer goes off, your green beans are done. Let the pressure vent and take your jars out of the canner. I let them cool for at least 12 hours hours without moving them anywhere and tighten the lids down every few hours until they are cool and won't tighten any further.
My green beans turned out really well. My mom and I worked together to can diced tomatoes and green beans. It is much more fun and much easier with a buddy.

Just a note: You will need a pressure canner for green beans. I have a pressure canner which doubles and does water bath as well. If you are truly interested in canning and preserving at home, then it is worth buying one. They aren't very expensive anymore but they are big so you have to have a decent place to store them. Now, on to the good stuff.
Ingredients:
Green beans
Water
Salt
Directions:
Break the ends off of the green beans and snap the beans into 1-2 inch pieces. Rinse the beans. I have a wonderful large, wire strainer that sits on the sink top. I set it on the counter and snapped the bean pieces directly into it so it would be easier to rinse them after.
Now it is time to sanitize the jars and lids. Boil water in a pot to sanitize the bottles and boil water in the canner to sanitize the lids. Just pour the boiling water into the jars to sanitize and pour it back out when you are ready to put green beans in the jars. Toss the lids into the canner when the water is boiling to sanitize them. Remove them after they are in for a few minutes.
In the large pot, boil water to add to the jars after the green beans have been added.
Use the directions for your pressure canner to add the correct amount of water to the canner. Mine calls for 3 quarts and has a fill line inside the pot. Bring the water to a boil.
Add green beans to the sanitized jars. Be sure to leave at least a 1/2 inch of head space. I usually just fill them up to the threaded part at the top of the jar. Add 1 tsp. of salt to each jar. Add boiling water to each jar. Again, only filling up to the threads.
Use a small rubber spatula to remove the air bubbles from the jars.
Wipe the jar rim of any water and salt. Any of this left on the rim could prevent a proper seal. Place a lid on each jar and tighten. Do not tighten too much at this point but tighten enough so that no water can seep through.
Place the jars into the pressure canner. Place the lid on the pressure canner and lock down. Use the 10 pound pressure weight for canning green beans unless you live in a high altitude. Once the weight starts to jiggle, cook for 25 minutes.
I won't give you complete directions on what to do for pressure canning because it is easier and safer to use the directions from your canner. The time and pressure weight is the information you need for green beans. For pressure canning, use the instructions from your canner.
When the timer goes off, your green beans are done. Let the pressure vent and take your jars out of the canner. I let them cool for at least 12 hours hours without moving them anywhere and tighten the lids down every few hours until they are cool and won't tighten any further.
My green beans turned out really well. My mom and I worked together to can diced tomatoes and green beans. It is much more fun and much easier with a buddy.
Canned Diced Tomatoes
The farmer's markets are swinging around here. With all of the unseasonable rain we have had this spring and summer, the crops are huge this year. It is pretty crazy. We have never had so much rain here all the way into July. Usually by this time in July, we are seeing 100* weather and our grass is so dry it has turned brown. We haven't even been under burn bans this year. Usually, we are under burn bans through most of June and July. One day, I will be able to have my own, very large vegetable garden. Until that day, I will be satisfied with locally grown farmer's market and organic produce. Last weekend we went to the farmer's market and bought fresh tomatoes, green beans, yellow squash and zucchini. I will write posts about how I processed/preserved each of them. For this post, I will give directions for canning diced tomatoes. This was my first time canning tomatoes. I am slowly learning to can different things. The tomatoes turned out really yummy. I plan on canning many more and making some other flavors of diced tomatoes.

Ingredients:
Fresh ripe tomatoes
Fresh lemons
Directions:
Core the tomatoes and gently score a small X, cutting just through the skin, on the bottom of each tomato. In a large pot, bring some water to boil. When the water is boiling, put the tomatoes in until the peel starts to peel up at the edges. Put the tomatoes in an ice bath to stop the cooking.
In your canner, start water boiling to sanitize the lids and jars. I sometimes use a tea kettle to boil water to sanitize the jars. In order to can, you must plan and multi-task or it will take you FOREVER.
While water is boiling and pieces are sanitizing, you can peel and dice the tomatoes. Put the cutting board inside a baking sheet with walls so you don't lose any of the juice while dicing tomatoes. You need the juice for your cans. This also makes clean up much easier. Discard the peels. I used a hand chopper to help with dicing the tomatoes. But you have to be careful with a hand chopper. If you chop too many times, you'll end up with mashed tomatoes or tomato sauce instead of diced tomatoes. Put your diced tomatoes with their juice in a large pot and bring to a low simmer. The directions I had said to boil for 30 minutes but I didn't cook it for quite so long. You can tell when to stop the boiling. The tomatoes start to foam and get very mushy. They will cook more during canning so you don't want to overcook them now.
While the tomatoes are simmering, juice the lemons. All of the instructions I have said to use citric acid or bottled lemon juice. But, citric acid that you just buy from the store, is usually made with corn ingredients. And I don't trust bottled lemon juice anymore either unless I know the source for sure. So I juiced the lemons myself. Juice several. It is better to have too much than not enough. You can always freeze the leftover lemon juice in ice cube trays to use later for marinades and juices.
Now, ladle the diced tomatoes into the sanitized jars leaving plenty of head space at the top of the jar. Add 1 Tbsp. of the fresh squeezed lemon juice to every jar of dice tomatoes. Use a small rubber spatula or chopstick to clear out the air bubbles and mix in the lemon juice. Tighten the lids and follow the directions for water bath canning in your canner. They should be in the canner for around 35 minutes.
After they are out of the canner, I usually tighten the lids every couple of hours for the rest of the day.
And here is a picture of my lovely canned diced tomatoes:
Chicken and Broccoli Penne
| Ingredients: Grapeseed or Olive Oil 1 bunch fresh broccoli or a few cups frozen broccoli 1 (12-16 oz.) bag penne 1 medium onion, minced 6 garlic cloves, minced 2 tsp. dried thyme 1/2-1 cup all-purpose flour 3-4 cups coconut milk (This made this dairy free until I added the mozzarella. This recipe is flavorful enough without the cheese added if you need dairy free. We added the cheese to ours but left one bowl without for our daughter who needs dairy free. I tried it both ways and loved it both ways.) Salt Pepper 4 boneless, skinless chicken breast, cut into bite sized pieces Mozzarella cheese, shredded (I used a small block but you can add or omit cheese according to taste and need.) Tomatoes (I used a couple of handfuls of grape tomatoes and chopped them up but you can use any tomato chopped up.) | |
Directions: Use some of the oil to grease a 9x13 inch baking dish and set aside. Preheat the oven to 350 degrees. In a large pot, bring the water for the pasta and broccoli to a boil. Stir in some salt and the broccoli. This part is going to be up to personal taste but we like our broccoli very soft so I cooked until the broccoli was tender. If you want a little bite in your broccoli, you will want to pull it back out of the water pretty quickly. Remove the broccoli with a slotted spoon, tossing it into the greased baking dish and add the pasta and a little more salt to the boiling water. Drain the pasta and toss it with the broccoli in the baking dish. While the pasta is cooking, in a skillet, add some oil and start browning the chicken. Season the chicken with salt and pepper or any other seasoning you prefer. We like the herb and garlic Mrs. Dash. When the chicken is done, toss it in with the penne and broccoli. During this time is also when you should chop the tomatoes. Rinse and wipe out the large pot to make the sauce. Add some more oil to the pot and add the onion and garlic until it starts to brown. Add a few tablespoons of the flour and whisk. Add the coconut milk (or other milk if you prefer) stirring constantly. Add in the thyme and salt and pepper. Add the flour a little at a time until the sauce is thick and creamy. Taste regularly to add more salt and pepper. | |
| Toss all ingredients together in the baking dish. Put the dish in the preheated oven for about 10 minutes. If you don't need dairy free, feel free to add the cheese before putting the dish in the oven. I divided the cheese into bowls so I could store it all in separate bowls for leftovers so we had some dairy free and some cheesy. This dish and it's leftovers went fast so I didn't get a picture. But we will definitely be making this again so I will add a picture later. |
Roasted Coconut Sweet Potatoes
This is a yummy veggie side dish and it warms up well when left over. If you like sweet potato, you will love this. I am always looking for some healthy vegetable side dishes. My family is very picky when it comes to vegetables, although they are getting better. I have also improved in my tastes for vegetables in the recent few years. This is a dish I could eat regularly. I hope it is one that my daughter will eventually like to eat as well. L still doesn't eat a variety of foods since she got so sick two years ago but she seems to be interested again. She actually touches the food and asks what it is rather than screaming and running away. We are making progress in very small baby steps.
Ingredients:
2 Tbsp. coconut oil
2 lbs. (approximately) sweet potatoes, cut into 1 inch chunks
1/2 tsp. salt
1/4 tsp. black pepper
1 tsp. fresh squeezed lime juice or grated lime zest (optional but adds a nice zing)
Directions:
Preheat oven to 400*F. After the sweet potatoes are cut into chunks, put them in a large bowl. Melt the coconut oil in a small saucepan over medium heat. Pour the melted coconut oil over the sweet potatoes in the bowl. Sprinkle the salt and pepper. Toss the contents of the bowl to evenly coat potatoes in coconut oil. Spread the potatoes in a single layer on a large rimmed baking sheet. Roast, stirring every 10-15 minutes for a total of 40 minutes or until tender all the way through the sweet potato chunks. Toss with lime juice or zest, then serve.
I will come back and add pictures later. I have many pictures but I am gradually catching up for now.
This recipe came from HERE. I didn't alter it at all but I have cooked it different ways in different pans without any problems. Sometimes you don't have enough pans to cook everything at the same time.
Ingredients:
2 Tbsp. coconut oil
2 lbs. (approximately) sweet potatoes, cut into 1 inch chunks
1/2 tsp. salt
1/4 tsp. black pepper
1 tsp. fresh squeezed lime juice or grated lime zest (optional but adds a nice zing)
Directions:
Preheat oven to 400*F. After the sweet potatoes are cut into chunks, put them in a large bowl. Melt the coconut oil in a small saucepan over medium heat. Pour the melted coconut oil over the sweet potatoes in the bowl. Sprinkle the salt and pepper. Toss the contents of the bowl to evenly coat potatoes in coconut oil. Spread the potatoes in a single layer on a large rimmed baking sheet. Roast, stirring every 10-15 minutes for a total of 40 minutes or until tender all the way through the sweet potato chunks. Toss with lime juice or zest, then serve.
I will come back and add pictures later. I have many pictures but I am gradually catching up for now.
This recipe came from HERE. I didn't alter it at all but I have cooked it different ways in different pans without any problems. Sometimes you don't have enough pans to cook everything at the same time.
Monday, April 28, 2014
Ginger Molasses Cookies
I know there have been long stretches between posts lately. My goal is to post several new things and catch up over summer break. I have a long to-do list before school starts next year. But I am pretty determined this summer because things are changing this year. I am not sure exactly how things will be yet, but changes are happening. For now, here is a new recipe. This has been a lifesaver for us. L has had more troubles again. She has had more break outs on her skin this year along with chronic sinus and ear infections. This on top of the tummy issues from before which we still believe is from food. Those issues always improved with diet changes but never completely went away. She seems to have become more sensitive and reactive lately. We have scheduled some allergy tests to start at the end of the month. Now that she is almost four years old, the doctors can actually see the problems she is having. Now they believe what I have been telling them since she was six weeks old. So now, we are finally getting some support by a few doctors. Hopefully, we will be getting some real answers soon. For now, we do what we can and these cookies have helped. If she eats these cookies, they seem to help settle her stomach when she is having trouble eating and digesting. I don't know the source of the original recipe but the original recipe has been changed a lot to suit our needs.
Ingredients:
1/2 cup grapeseed oil *
3/4 cup sugar
1 egg
1/4 cup molasses
2 cups flour
1 tsp. baking soda
1 tsp. ground cinnamon
1 tsp. ground ginger
1/2 tsp. ground cloves
1/2 tsp. salt
Directions:
In a large bowl, beat together the butter and sugar until light and fluffy. (The original recipe indicates using a mixer but I do all of this recipe by hand.) Scrape down the sides of the bowl with a spatula. Beat in the egg until fully incorporated. Then add the molasses and stir until combined.
In another bowl, whisk together the remaining ingredients. Stir dry ingredients into the wet and stir just until incorporated. At this point, the dough gets very thick. When everything is mostly together, I use my hands to finish mixing the dough. Portion the dough into three pieces and roll each into approximately one inch logs. (Beware: If you have men or children in the house, you will get poop jokes here. You will see what I mean in the pictures. Trust me, it smells much better. Ha!) Wrap and chill for at least one hour. These will be okay in the fridge up to overnight but I wouldn't leave them more than 24 hours without getting them finished. However, the dough does do well in the freezer. If you can't finish them or if you want to make an extra large batch and freeze some for next time, go for it! Just put the dough in the freezer.
Preheat oven to 350 F. On a floured work surface using a floured rolling pin, roll chilled dough out to desired thickness. This is where you have options. If you want a crunch ginger snap, roll the dough thin. If you want a nice, soft molasses cookie, roll the dough thicker. Use a small round cookie cutter to cut out cookies. Don't forget to dip the cutter into a little flour too. Place onto a parchment lined baking sheet, about an inch apart. Bake for approximately 5-10 minutes. Again, the time is changing factor. In my moms oven, ten minutes is perfect. In my oven, ten minutes is too much. In my oven, five minutes is perfect for soft molasses cookies and eight minutes is perfect for crunchier ginger snaps. If you want the crunchier cookies, go ahead and cook them close to the ten minutes. If you want softer cookies, take them out early. They will cook some after you take them out of the oven.
*The original recipe used softened butter. If you are not dairy free, you could use butter. You could also use a different kind of oil. We prefer grapeseed oil because it is nearly tasteless. Coconut and olive oils are good in many baked goods but are stronger tastes so they don't go with all foods. Feel free to experiment.
And now for the pics:


Ingredients:
1/2 cup grapeseed oil *
3/4 cup sugar
1 egg
1/4 cup molasses
2 cups flour
1 tsp. baking soda
1 tsp. ground cinnamon
1 tsp. ground ginger
1/2 tsp. ground cloves
1/2 tsp. salt
Directions:
In a large bowl, beat together the butter and sugar until light and fluffy. (The original recipe indicates using a mixer but I do all of this recipe by hand.) Scrape down the sides of the bowl with a spatula. Beat in the egg until fully incorporated. Then add the molasses and stir until combined.
In another bowl, whisk together the remaining ingredients. Stir dry ingredients into the wet and stir just until incorporated. At this point, the dough gets very thick. When everything is mostly together, I use my hands to finish mixing the dough. Portion the dough into three pieces and roll each into approximately one inch logs. (Beware: If you have men or children in the house, you will get poop jokes here. You will see what I mean in the pictures. Trust me, it smells much better. Ha!) Wrap and chill for at least one hour. These will be okay in the fridge up to overnight but I wouldn't leave them more than 24 hours without getting them finished. However, the dough does do well in the freezer. If you can't finish them or if you want to make an extra large batch and freeze some for next time, go for it! Just put the dough in the freezer.
Preheat oven to 350 F. On a floured work surface using a floured rolling pin, roll chilled dough out to desired thickness. This is where you have options. If you want a crunch ginger snap, roll the dough thin. If you want a nice, soft molasses cookie, roll the dough thicker. Use a small round cookie cutter to cut out cookies. Don't forget to dip the cutter into a little flour too. Place onto a parchment lined baking sheet, about an inch apart. Bake for approximately 5-10 minutes. Again, the time is changing factor. In my moms oven, ten minutes is perfect. In my oven, ten minutes is too much. In my oven, five minutes is perfect for soft molasses cookies and eight minutes is perfect for crunchier ginger snaps. If you want the crunchier cookies, go ahead and cook them close to the ten minutes. If you want softer cookies, take them out early. They will cook some after you take them out of the oven.
*The original recipe used softened butter. If you are not dairy free, you could use butter. You could also use a different kind of oil. We prefer grapeseed oil because it is nearly tasteless. Coconut and olive oils are good in many baked goods but are stronger tastes so they don't go with all foods. Feel free to experiment.
And now for the pics:
Finished Cookies:
Logs of dough, wrapped and ready to chill:
(now you can see what I mean by poop jokes)
Three of the batches went into the freezer:
I know I have mentioned this before, but I am going to mention it again. If you haven't purchased one of these food savers and you want to do freezer cooking, once a month cooking, meal planning, etc., you should definitely spend the money. It is worth it.:
Tuesday, January 14, 2014
Homemade Lotion
Here is the recipe for the lotion I promised after the lotion bars. My mother in law loves this. She has circulation problems in her legs and they itch and break out. This lotion has helped it heal when nothing else has. I never thought about that when I made it but I'm ecstatic that it helped her so much. I hope it can help more people too.
Ingredients:
1/2 cup almond oil (if you need to be nut free you can use olive or grapeseed)
1/4 cup coconut oil
1/8 cup beeswax
1/2 tsp. vitamin E oil
30 drops essential oil (optional)
Directions:
Add all ingredients to a mason jar. Add 1-2 inches of water in a sauce pan and put on medium heat. Put the jar in the sauce pan and shake the ingredients periodically while melting. When everything is melted and mixed, pour into containers. I used some squeeze bottles for this lotion. It seems to be thin enough to use in a pump but I have not tried it that way yet. If you put it in a jar or container that can't be squeezed, you may need to stir it up after it cools.
I made this for Christmas presents. I will update later when I know how everyone liked it. I like it so far. I've been using coconut oil on my hands and body for awhile but it is a pain to melt every time you need to use it. This way I can put it in a container and it is ready to use. It is a little greasy, but I've never found a lotion I thought wasn't greasy or oily. I have had the best luck squeezing it out onto the back of my hand, then spreading it around so the majority of the oil is on the back of my hand. If my palms and fingers feel to oily, I usually just grab a dry rag or towel (or if I'm out- a paper towel) and wipe off my palms. I have really bad excema that flairs up worse in the winter. My hands will crack and bleed. And no lotion works. In fact, most of them burn, break me out, or make the excema worse. Even the prescription ointments I was given didn't work. I also have patches on my arms and legs. I'm lucky that I don't get them on my face like some people I know. But if you or someone you know has trouble with skin issues or allergies to topical products, this may help them.
I did not come up with this recipe myself, of course. I did, however, edit the ones I found until it worked for me. I had four different lotion recipes that I used to change things around until it came out the way I wanted.
I will add pictures next time I make this. I focused on pictures of the lotion bars and completely forgot about them by the time I did this lotion.
Ingredients:
1/2 cup almond oil (if you need to be nut free you can use olive or grapeseed)
1/4 cup coconut oil
1/8 cup beeswax
1/2 tsp. vitamin E oil
30 drops essential oil (optional)
Directions:
Add all ingredients to a mason jar. Add 1-2 inches of water in a sauce pan and put on medium heat. Put the jar in the sauce pan and shake the ingredients periodically while melting. When everything is melted and mixed, pour into containers. I used some squeeze bottles for this lotion. It seems to be thin enough to use in a pump but I have not tried it that way yet. If you put it in a jar or container that can't be squeezed, you may need to stir it up after it cools.
I made this for Christmas presents. I will update later when I know how everyone liked it. I like it so far. I've been using coconut oil on my hands and body for awhile but it is a pain to melt every time you need to use it. This way I can put it in a container and it is ready to use. It is a little greasy, but I've never found a lotion I thought wasn't greasy or oily. I have had the best luck squeezing it out onto the back of my hand, then spreading it around so the majority of the oil is on the back of my hand. If my palms and fingers feel to oily, I usually just grab a dry rag or towel (or if I'm out- a paper towel) and wipe off my palms. I have really bad excema that flairs up worse in the winter. My hands will crack and bleed. And no lotion works. In fact, most of them burn, break me out, or make the excema worse. Even the prescription ointments I was given didn't work. I also have patches on my arms and legs. I'm lucky that I don't get them on my face like some people I know. But if you or someone you know has trouble with skin issues or allergies to topical products, this may help them.
I did not come up with this recipe myself, of course. I did, however, edit the ones I found until it worked for me. I had four different lotion recipes that I used to change things around until it came out the way I wanted.
I will add pictures next time I make this. I focused on pictures of the lotion bars and completely forgot about them by the time I did this lotion.
Coconut Lotion Bars
I was recently (finally) diagnosed with excema. Although I've ALWAYS known I had it. I'm allergic to every lotion out there. My breakouts get worse in the winter of course and I get patches up my arms and around my thighs. And the backs of my hands crack and bleed. But lotion breaks me out and burns like my hands are on fire. And they turn really, really, REALLY red. And it is all getting worse with age. So this year I decided to do something about it and make my own lotion. I even shared the experience and made several bars for family at Christmas. So far everyone has liked my lotions. I made liquid lotion too and I'll post the instructions for that later. This though, is for the bar. I like it the best. But the other lotion is better for using with the child.
Ingredients:
1/2 cup coconut oil
1/2 cup Shea butter (if you need to make this nut free, I believe you could substitute cocoa butter)
2/3 cup beeswax pastilles
1/2 tsp. vitamin E oil
20-30 drops essential oils (optional for scent)
Directions:
Combine ingredients in a quart size mason jar (with lid to prevent water from damaging lotion bar mixture). Fill a sauce pan with about two inches of water and place over medium to medium-high heat. Bring the water to a simmer and shake up the jar periodically while the contents melt. When everything is liquid, pour into molds. I had plastic soap-making molds. You could use silicon molds, especially if you like them enough to make them more than once. It is hard to pop these out of glass or metal molds/pans. Let molds set overnight. Carefully pop out of molds. I wrapped them in cellophane to give as gifts at Christmas. I also kept some for myself. These are great to use after showers, shaving and washing dishes.
If these get a little to soft or start melting, you can harden it back up by sticking it in the fridge for awhile. The cold temperatures will harden the coconut oil and Shea butter.


I did not come up with this recipe at all so I need to give credit. I, of course, found it on pinterest. You can find the original post where I got the recipe HERE.
Ingredients:
1/2 cup coconut oil
1/2 cup Shea butter (if you need to make this nut free, I believe you could substitute cocoa butter)
2/3 cup beeswax pastilles
1/2 tsp. vitamin E oil
20-30 drops essential oils (optional for scent)
Directions:
Combine ingredients in a quart size mason jar (with lid to prevent water from damaging lotion bar mixture). Fill a sauce pan with about two inches of water and place over medium to medium-high heat. Bring the water to a simmer and shake up the jar periodically while the contents melt. When everything is liquid, pour into molds. I had plastic soap-making molds. You could use silicon molds, especially if you like them enough to make them more than once. It is hard to pop these out of glass or metal molds/pans. Let molds set overnight. Carefully pop out of molds. I wrapped them in cellophane to give as gifts at Christmas. I also kept some for myself. These are great to use after showers, shaving and washing dishes.
If these get a little to soft or start melting, you can harden it back up by sticking it in the fridge for awhile. The cold temperatures will harden the coconut oil and Shea butter.


I did not come up with this recipe at all so I need to give credit. I, of course, found it on pinterest. You can find the original post where I got the recipe HERE.
Italian Diced Tomatoes (So much better than the canned from the store)
I have used the canned version of this in past posts. That is, until I found out citric acid (which is in all canned tomatoes I've found so far) is often derived from corn. So, I decided that when tomatoes were in season, I would buy up as much as possible and make my own Italian diced tomatoes and can them. Well, so far I haven't found enough tomatoes to can any but I have made some for meals as I make them. Eventually, I will add canned notes to this blog. Until then, I will go ahead and give a recipe. Now there are not exact amounts on most of this. I just add ingredients a little at a time until it tastes excellent. I had taste testers who agreed, this sauce is amazing.
Ingredients:
Tomatoes
salt
pepper
garlic
onion (I prefer sweet onion)
olive or coconut oil (I've used both and both are good)
basil
oregano
(Note: This can be made with fresh or dried garlic, onion, basil and oregano.)
Directions:
Mince an onion and a clove or two of garlic (depending on your taste for garlic). Saute the onion and garlic in a little olive or coconut oil. While this is sauteing, dice up the tomatoes. I roughly chopped into chunks, then put them in my hand chopper to dice them really small. I have a Pampered Chef hand chopper. I use it to mince the garlic and onion too. It's wonderful for this type of stuff. When the garlic and onion is soft and transparent, add in the tomatoes. Now add salt and pepper and stir around on low/medium heat until warmed through. Add basil and oregano a little at a time until it suits your taste. You might want to add salt and pepper here too.
Trust me, this is amazing. Here is a picture of it used to top some chicken.


Another way to use this, get out your slow cooker.
Ingredients:
Italian Diced Tomatoes
4 Chicken Breasts
Directions:
In a slow cooker, add your chicken breasts. Top with plenty of Italian diced tomatoes. It should pretty much cover all chicken. Cook on low for 4 hours or high for 8 hours. Serve over rice.
Ingredients:
Tomatoes
salt
pepper
garlic
onion (I prefer sweet onion)
olive or coconut oil (I've used both and both are good)
basil
oregano
(Note: This can be made with fresh or dried garlic, onion, basil and oregano.)
Directions:
Mince an onion and a clove or two of garlic (depending on your taste for garlic). Saute the onion and garlic in a little olive or coconut oil. While this is sauteing, dice up the tomatoes. I roughly chopped into chunks, then put them in my hand chopper to dice them really small. I have a Pampered Chef hand chopper. I use it to mince the garlic and onion too. It's wonderful for this type of stuff. When the garlic and onion is soft and transparent, add in the tomatoes. Now add salt and pepper and stir around on low/medium heat until warmed through. Add basil and oregano a little at a time until it suits your taste. You might want to add salt and pepper here too.
Trust me, this is amazing. Here is a picture of it used to top some chicken.


Another way to use this, get out your slow cooker.
Ingredients:
Italian Diced Tomatoes
4 Chicken Breasts
Directions:
In a slow cooker, add your chicken breasts. Top with plenty of Italian diced tomatoes. It should pretty much cover all chicken. Cook on low for 4 hours or high for 8 hours. Serve over rice.
Saturday, October 26, 2013
Pumpkin Spice Creamer
It has been awhile since I have been very active on my blog. Life has been hectic. Every week I think I will have time to blog but something comes up. I started a long term substitute position in a library in August. It has been so much fun and I get to stay until Christmas Break. Hopefully it will help me to get a full time position in my own classroom. At the same time I have been busy at home spending time with my three year old. Yes, I said THREE. I can't believe she is growing so fast. Also, the husband finally got to start working first shift, so he is actually home with us. We've been soaking up the family time. I have still been cooking and experimenting but it will take me awhile to catch up here. I will work on it but it may be during breaks that I have a surge in blog posts. For now, I have also discovered why people like coffee! I stopped drinking pop a few months ago. So I never get any caffeine unless I get a tea or coffee. At home, our tea is decaf and I never drink more than one coffee at a time. But, since I get up at 4 AM now in order to get to work (it's quite a commute for me at this point), I have a little trouble getting myself going. Especially now that the weather has gotten colder.
Anyway, I love the pumpkin spice lattes from Starbucks, but I hate the ingredients and price. I found several recipes online to make your own pumpkin spice creamer. I wasn't completely satisfied with any of them. I already make my own plain sweet creamer and I have already posted the recipe for that. I easily turned that into a pumpkin spice creamer. Here is how:
Ingredients:
1 can evaporated milk
1 can sweetened condensed milk
1 cup pureed pumpkin (canned or fresh)
1/2 tsp. pumpkin pie spice
Directions:
In a saucepan, heat 1/2 the can of evaporated milk, pumpkin and pumpkin pie spice to a low simmer. Whisk together until this comes to a simmer, then take it off of the heat. Let this cool completely. When it is cool, whisk in the rest of the evaporated milk and the sweetened condensed milk. Pour into two mason jars. This will stay good in the refrigerator for a week. I put one in the fridge to use and one in the freezer to save. You could also give one away for gifts OR you could keep one at home and one at work if you drink both places. It is very good. I believe I outdid Starbucks with this one.


Honey Garlic Pork Chops
I have been busy with my new temporary job and I have been trying to make meals that can be made quickly and easily. They also have to be good warmed up for lunches at work. We prefer to eat homemade foods rather than eating out or buying pre-made boxed foods. The easiest way for easy, quick, healthy, homemade meals is to use marinades. I have started making up bags with marinades and putting meat in them and freezing them. Then I can take it out of the freezer the night before, and it's ready the next night for cooking. This is one of the marinades we have been using for pork chops.
Ingredients:
Ingredients:
1/4 cup honey
1/2 cup apple juice
2 Tbsp. oil (I usually use grapeseed or olive)
1/2 cup apple juice
2 Tbsp. oil (I usually use grapeseed or olive)
3 Tbsp. coconut aminos (This is what we use to replace soy sauce.)
6 garlic cloves, minced
4 pork chops (I use boneless. I hate eating around bones.)
Directions:
In a ziploc bag, add all ingredients and close and mix around. Let marinade for at least 2 hours. Once marinated, grill or bake. We grilled and loved them. But if you can't grill, bake in a preheated oven for 35 minutes at 350 degrees.
I got this recipe from Pinterest and just replaced the soy sauce. To see the original post, look here.
Subscribe to:
Posts (Atom)