***Disclaimer: I am still perfecting this recipe. Feel free to use it and make it your own. It is very important to make sure the layer of chicken for the crust is very thin.
One thing I have missed since losing weight is pizza. It is so hard to make sure you have a pizza that matches nutritional needs after surgery or really, to maintain any weight loss. This is a way to have pizza and still get the high protein and low carb needed. Keep in mind, we do not have a full-sized oven where we live. We have a large toaster oven. This works fine for most of our needs, but if you are cooking in a full-sized oven with a regular sized sheet pan, you may need to up the amounts on the ingredients listed.
Ingredients:
Crust:
1-2 boneless, skinless chicken breasts
1/3-1/2 cup grated parmesan
1/2 tsp. dried oregano
1/2 tsp. dried rosemary
1/2 tsp. salt
pinch of black pepper
Topping:
Favorite tomato sauce (Sometimes I make my own, sometimes I buy carefully)
1/4 cup parmesan
Sprinkle of chopped basil
Mozzerella
Favorite pizza toppings
Directions:
Preheat oven to 450°F. Add all of the ingredients for the crust to a food processor. Blend until mixed well. Line a baking sheet with parchment paper. Add pizza crust spread very thin. The thin crust is key. The crust will thicken some as it cooks and to get the crust to be a similar consistency to regular pizza, it must be pretty thin. Bake in the oven for 15 minutes, or until the edges have browned and the chicken has cooked through.
Add ingredients for the toppings starting with the sauce. You can put whatever toppings you like. I prefer cheese or pineapple. J prefers bacon. We made a half cheese, half bacon pizza. Back in the oven with the toppings for 5-8 minutes, or until the cheese is bubbly and starting to golden.
Remove from the oven, slice, and enjoy after cooling for a few minutes.
Showing posts with label Gluten-Free. Show all posts
Showing posts with label Gluten-Free. Show all posts
Monday, April 20, 2020

Monday, April 6, 2020
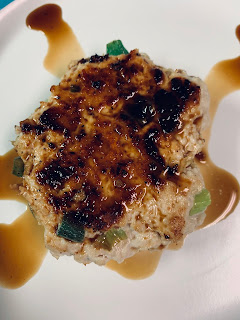
Teriyaki Burgers
Well, things in our world are very crazy right now. Big changes have happened for our little family at the same time and things have not gone as planned at all. My husband and I have both found ourselves without our regular jobs during this COVID-19 craziness. I really don't have another word for the current situation. I am still working but inconsistently. My husband is not working at all. Tough times...
However, I am lucky enough to have a decently stocked kitchen since I am normally a bit of a "prepper" when it comes to the freezer and pantry. With the changes I have had since surgery, I am still working hard to be healthy and continue to lose some weight. I have now lost 97 pounds, over 50 inches, and 5-6 sizes depending on the fit of the clothes. I am no longer on the obesity charts, no longer prediabetic, no longer have high blood pressure, and no longer in plus size clothing. Some think that surgery is the easy way out, but it is not. I have still had to do a lot of work and after years of medical issues, it was truly a life saver.
I made this burgers with ground turkey. However, in the future, I believe I will use other meat such as pork or bison. I just don't care for the texture of ground turkey. You could also put these on a bun like a burger but we did not. I am very careful with carbs and usually prefer to get better carbs from other sources.
Friends often ask if they can leave something out... Of course you can. Some things need a substitution but some don't. If you don't like onions, leave them out and add flavor with something else... more garlic and ginger perhaps. If you don't like ginger, leave it out. If you don't like ground turkey, use pork, chicken, bison, or whatever is your favorite ground meat.
Ingredients:
1 lb. lean ground turkey (or any lean meat)
1/4 cup scallions
2 cloves garlic, minced
1 tsp. fresh grated ginger
1/4 cup coconut aminos (you can use soy sauce but I don't do soy)
1/4 cup chicken stock
1 Tbsp. rice wine vinegar
1 small chopped onion
1/4 tsp. sesame oil
salt and pepper
olive oil spray
Directions:
Combine turkey, scallions, garlic, ginger, and pepper in a bowl. Divide mixture into patties. If you are putting this on a bun, make 4 patties. If not, you can make the patties smaller if you like. Spray the bottom of a skillet with the olive oil. Cook the burgers until cooked through on medium/medium-high heat. Remove burgers from pan. You can keep the burgers in the oven to stay warm or tent with foil. Pour chicken stock, coconut aminos, vinegar, and onions to the hot pan. Simmer until onions are soft. Stir in sesame oil and serve over the burger patties.
However, I am lucky enough to have a decently stocked kitchen since I am normally a bit of a "prepper" when it comes to the freezer and pantry. With the changes I have had since surgery, I am still working hard to be healthy and continue to lose some weight. I have now lost 97 pounds, over 50 inches, and 5-6 sizes depending on the fit of the clothes. I am no longer on the obesity charts, no longer prediabetic, no longer have high blood pressure, and no longer in plus size clothing. Some think that surgery is the easy way out, but it is not. I have still had to do a lot of work and after years of medical issues, it was truly a life saver.
I made this burgers with ground turkey. However, in the future, I believe I will use other meat such as pork or bison. I just don't care for the texture of ground turkey. You could also put these on a bun like a burger but we did not. I am very careful with carbs and usually prefer to get better carbs from other sources.
Friends often ask if they can leave something out... Of course you can. Some things need a substitution but some don't. If you don't like onions, leave them out and add flavor with something else... more garlic and ginger perhaps. If you don't like ginger, leave it out. If you don't like ground turkey, use pork, chicken, bison, or whatever is your favorite ground meat.
Ingredients:
1 lb. lean ground turkey (or any lean meat)
1/4 cup scallions
2 cloves garlic, minced
1 tsp. fresh grated ginger
1/4 cup coconut aminos (you can use soy sauce but I don't do soy)
1/4 cup chicken stock
1 Tbsp. rice wine vinegar
1 small chopped onion
1/4 tsp. sesame oil
salt and pepper
olive oil spray
Directions:
Combine turkey, scallions, garlic, ginger, and pepper in a bowl. Divide mixture into patties. If you are putting this on a bun, make 4 patties. If not, you can make the patties smaller if you like. Spray the bottom of a skillet with the olive oil. Cook the burgers until cooked through on medium/medium-high heat. Remove burgers from pan. You can keep the burgers in the oven to stay warm or tent with foil. Pour chicken stock, coconut aminos, vinegar, and onions to the hot pan. Simmer until onions are soft. Stir in sesame oil and serve over the burger patties.

Monday, August 27, 2018
Homemade Ranch
Hello! It has been well over a year since I last posted on my blog. I always have good intentions but my plans just rarely work out properly. I do intend (again) to start posting more, even if it isn't always recipes. Today however, it is a recipe. At one time, I had a recipe for homemade dry ranch mix and ranch... After a few years of messing with the recipe, it was all messed up. So I started over and I am pretty happy with my ranch routine now. My main concern was that my daughter could try the ranch if she ever wanted. She still doesn't have the varied diet I would like but she is healthy and now and then I can get her to try something. So most things in our house are made corn free and safe for her. Many recipes for homemade ranch include ingredients such as mayonnaise or pre-bottled/bagged mixes. My daughter can have none of these. So I looked through many recipes and came up with a mix that worked for us and I actually enjoy. There are options and I will list them in the ingredients. As I have said before, I don't measure exactly so measurements are approximate and easy to change to taste. Also, many people will complain about the use of powders such as garlic powder and onion powder... If this doesn't suit you, by all means, use fresh. However, we have to do a LOT of cooking from scratch so we do take short cuts when we can safely. Not all powders are safe, but there are a few manufacturers who have made many great changes in the ingredients they use.
Ingredients:
1/4 cup milk
1 cup sour cream
squeeze of lemon juice
1 Tbsp. onion powder/dried chives or small bunch fresh chives
1 Tbsp. dried parsley or small bunch fresh parsley
1/4 tsp. garlic powder or 1 fresh clove garlic
1/4 tsp. paprika (a little goes a long way)
1/2 tsp. salt
1/4 tsp. pepper
extra sour cream and milk to adjust thickness
Directions:
Start by pouring the milk, sour cream, and lemon juice in a mason jar. I usually use pint size and make fresh regularly. This doesn't last more than a week or so and this is really easy and quick to make. Add in the rest of the dry/fresh ingredients, secure the lid, and shake up the mix. When the ranch is all mixed, add more sour cream and/or milk to adjust thickness to your preference. I know that I like the ranch thicker or thinner depending on what I am eating or dipping. Keep shaking to mix when ingredients are adjusted or added.
Ingredients:
1/4 cup milk
1 cup sour cream
squeeze of lemon juice
1 Tbsp. onion powder/dried chives or small bunch fresh chives
1 Tbsp. dried parsley or small bunch fresh parsley
1/4 tsp. garlic powder or 1 fresh clove garlic
1/4 tsp. paprika (a little goes a long way)
1/2 tsp. salt
1/4 tsp. pepper
extra sour cream and milk to adjust thickness
Directions:
Start by pouring the milk, sour cream, and lemon juice in a mason jar. I usually use pint size and make fresh regularly. This doesn't last more than a week or so and this is really easy and quick to make. Add in the rest of the dry/fresh ingredients, secure the lid, and shake up the mix. When the ranch is all mixed, add more sour cream and/or milk to adjust thickness to your preference. I know that I like the ranch thicker or thinner depending on what I am eating or dipping. Keep shaking to mix when ingredients are adjusted or added.
Sunday, June 4, 2017
Banana Pancakes and Blueberry Mash
I made this recipe for breakfast hoping that my daughter would try something different. She is still very afraid of different foods and has latched onto about 4 foods she will eat. She is also a child who will starve herself until she is very sick. We've been there, done that. She obviously takes after me because she is INCREDIBLY stubborn. I, being her worrisome mom, am very worried about her health at this point. She is almost seven and is still very afraid of expanding her food choices. I still get very angry at her previous doctors when I think about it. She did not eat this either though, despite my pleading, manipulating, and yummy noises.
My husband, however, did eat some. He normally hates pancakes but loves waffles. He says, next time, I should pour it into the waffle iron. I will consider that a win!
I did not pull this recipe from anywhere in particular. I looked through a lot of recipes, posts, and blogs and this recipe, and small variations thereof, is fairly popular.
Pancakes:
Ingredients:
3 bananas
4 eggs
cinnamon (optional)
Directions:
Mash or blend bananas. (I used my Ninja blender. It's awesome! If you don't have one, you should check them out.) Then, mix in the eggs. It should be looking a bit like a batter now. Sprinkle in cinnamon to taste or personal preference. Spoon into heated pan or griddle and flip as needed. My griddle was otherwise occupied so I used a pan on my stove. Cook low and slow...
HINT: Make the pancakes smaller. I learned very quickly that this type of pancake cooks much easier and more even if you make them smaller.


Blueberry Mash
Ingredients:
Blueberries
Sugar (optional)
Directions:
In blender, blend up the blueberries. Add sugar to taste, if desired. Spoon over pancakes. I prefer something like this instead of syrup.


My husband, however, did eat some. He normally hates pancakes but loves waffles. He says, next time, I should pour it into the waffle iron. I will consider that a win!
I did not pull this recipe from anywhere in particular. I looked through a lot of recipes, posts, and blogs and this recipe, and small variations thereof, is fairly popular.
Pancakes:
Ingredients:
3 bananas
4 eggs
cinnamon (optional)
Directions:
Mash or blend bananas. (I used my Ninja blender. It's awesome! If you don't have one, you should check them out.) Then, mix in the eggs. It should be looking a bit like a batter now. Sprinkle in cinnamon to taste or personal preference. Spoon into heated pan or griddle and flip as needed. My griddle was otherwise occupied so I used a pan on my stove. Cook low and slow...
HINT: Make the pancakes smaller. I learned very quickly that this type of pancake cooks much easier and more even if you make them smaller.


Blueberry Mash
Ingredients:
Blueberries
Sugar (optional)
Directions:
In blender, blend up the blueberries. Add sugar to taste, if desired. Spoon over pancakes. I prefer something like this instead of syrup.


Italian Chicken and Tomatoes (Reprise)
I have already posted this recipe once. However, it is very popular and many have asked for the recipe. I have also changed a few things to make it easier. You can see the previous post HERE. The old recipe was using fresh diced tomatoes. This is still great, but let's face it... We just can't always do that. Tomatoes aren't great fresh all year round. This post will hopefully make this recipe easier but it is still completely healthy and safe for my daughter. It also looks the same so you can see a picture of the recipe in the above link.
Ingredients:
4 chicken breasts
1 can diced tomatoes*** (see note)
1 Tbsp. Italian herbs and seasonings (I use McCormicks Italian Herb Mix. You can see it HERE.)
Salt to taste
***Note: You can still use fresh diced tomatoes. You can also use my diced tomato canning recipe to can your own during high season. You can find that post HERE. OR, we have found one brand which we can buy at the local natural foods store which doesn't taste horrible or come in a metal can. You can see it HERE. I can as many as I can but it never seems to be enough.
Directions:
In a slow cooker, poor in about a quarter of the diced tomatoes. Next, place the chicken breasts in the slow cooker. Then, pour the rest of the diced tomatoes and seasonings in the cooker. Cook on high for 4 hours or on low for 8 hours.
I typically serve this with rice (Rice Recipe Here) and green beans. It is amazing leftover as well.
Ingredients:
4 chicken breasts
1 can diced tomatoes*** (see note)
1 Tbsp. Italian herbs and seasonings (I use McCormicks Italian Herb Mix. You can see it HERE.)
Salt to taste
***Note: You can still use fresh diced tomatoes. You can also use my diced tomato canning recipe to can your own during high season. You can find that post HERE. OR, we have found one brand which we can buy at the local natural foods store which doesn't taste horrible or come in a metal can. You can see it HERE. I can as many as I can but it never seems to be enough.
Directions:
In a slow cooker, poor in about a quarter of the diced tomatoes. Next, place the chicken breasts in the slow cooker. Then, pour the rest of the diced tomatoes and seasonings in the cooker. Cook on high for 4 hours or on low for 8 hours.
I typically serve this with rice (Rice Recipe Here) and green beans. It is amazing leftover as well.
Saturday, June 4, 2016
Homemade Lemonade and Lemonade Syrup
Two posts in one day! What?! Well, it's rainy and yucky outside. I haven't even been able to open my pool yet. It's criminal! Already four days into June and I can't open my pool! So, I'm on my computer pulling new recipes and watching L play with her toys. The house is a wreck because she is bored. She has pulled out toys from the deepest corners of her toy boxes. This is a child who does not enjoy just sitting and playing video games like other kids. She is always on the go go go... She did mention wanting to try lemonade though. L? Wants to try something new? No way! So I went and bought some lemons. She, of course, cannot just have the lemonade at the store. I have to make it from scratch. But I already learned how to do this long ago. So, this morning we squeezed lemons. She thought that was really cool. She only wanted to juice one though. She didn't want to touch the "dirty seeds." My sensory child... They were slimy from the juice and pulp. But she did sit and watch. It was a good experience for her. So now I will share the experience with you. :)
And guess what... I remembered pictures this time!!!

Ingredients:
1 cup fresh squeezed lemon juice (I squeezed about 6 medium lemons for this this morning)
1/2 cup water
1 cup raw organic sugar
Directions:
In a small/medium saucepan, bring lemon juice and water to a boil. Whisk in sugar. Make sure you are using non reactive cookware. I used a silicon coated whisk. Pour into a jar and let cool. Refrigerate syrup in jar for up to one month.
To make this into lemonade, stir 1 Tablespoon (per 8 oz.) of syrup into a cold glass of water. Adjust to taste of course. I find that two tablespoons of syrup in one of my larger glasses of ice water is perfect.

And guess what... I remembered pictures this time!!!

Lemonade Syrup
Ingredients:
1 cup fresh squeezed lemon juice (I squeezed about 6 medium lemons for this this morning)
1/2 cup water
1 cup raw organic sugar
Directions:
In a small/medium saucepan, bring lemon juice and water to a boil. Whisk in sugar. Make sure you are using non reactive cookware. I used a silicon coated whisk. Pour into a jar and let cool. Refrigerate syrup in jar for up to one month.
To make this into lemonade, stir 1 Tablespoon (per 8 oz.) of syrup into a cold glass of water. Adjust to taste of course. I find that two tablespoons of syrup in one of my larger glasses of ice water is perfect.
This is what my jar of syrup looks like:

Monday, July 14, 2014
Canned Green Beans
As my previous post mentioned, I've been canning and freezing several fresh vegetables this summer. The last post was instructions for canning diced tomatoes. This one is for canning green beans. My picky family will almost always eat green beans. There are so many ways you can season green beans to make them work with your meal flavors. We like to experiment with them.
Just a note: You will need a pressure canner for green beans. I have a pressure canner which doubles and does water bath as well. If you are truly interested in canning and preserving at home, then it is worth buying one. They aren't very expensive anymore but they are big so you have to have a decent place to store them. Now, on to the good stuff.
Ingredients:
Green beans
Water
Salt
Directions:
Break the ends off of the green beans and snap the beans into 1-2 inch pieces. Rinse the beans. I have a wonderful large, wire strainer that sits on the sink top. I set it on the counter and snapped the bean pieces directly into it so it would be easier to rinse them after.
Now it is time to sanitize the jars and lids. Boil water in a pot to sanitize the bottles and boil water in the canner to sanitize the lids. Just pour the boiling water into the jars to sanitize and pour it back out when you are ready to put green beans in the jars. Toss the lids into the canner when the water is boiling to sanitize them. Remove them after they are in for a few minutes.
In the large pot, boil water to add to the jars after the green beans have been added.
Use the directions for your pressure canner to add the correct amount of water to the canner. Mine calls for 3 quarts and has a fill line inside the pot. Bring the water to a boil.
Add green beans to the sanitized jars. Be sure to leave at least a 1/2 inch of head space. I usually just fill them up to the threaded part at the top of the jar. Add 1 tsp. of salt to each jar. Add boiling water to each jar. Again, only filling up to the threads.
Use a small rubber spatula to remove the air bubbles from the jars.
Wipe the jar rim of any water and salt. Any of this left on the rim could prevent a proper seal. Place a lid on each jar and tighten. Do not tighten too much at this point but tighten enough so that no water can seep through.
Place the jars into the pressure canner. Place the lid on the pressure canner and lock down. Use the 10 pound pressure weight for canning green beans unless you live in a high altitude. Once the weight starts to jiggle, cook for 25 minutes.
I won't give you complete directions on what to do for pressure canning because it is easier and safer to use the directions from your canner. The time and pressure weight is the information you need for green beans. For pressure canning, use the instructions from your canner.
When the timer goes off, your green beans are done. Let the pressure vent and take your jars out of the canner. I let them cool for at least 12 hours hours without moving them anywhere and tighten the lids down every few hours until they are cool and won't tighten any further.
My green beans turned out really well. My mom and I worked together to can diced tomatoes and green beans. It is much more fun and much easier with a buddy.

Just a note: You will need a pressure canner for green beans. I have a pressure canner which doubles and does water bath as well. If you are truly interested in canning and preserving at home, then it is worth buying one. They aren't very expensive anymore but they are big so you have to have a decent place to store them. Now, on to the good stuff.
Ingredients:
Green beans
Water
Salt
Directions:
Break the ends off of the green beans and snap the beans into 1-2 inch pieces. Rinse the beans. I have a wonderful large, wire strainer that sits on the sink top. I set it on the counter and snapped the bean pieces directly into it so it would be easier to rinse them after.
Now it is time to sanitize the jars and lids. Boil water in a pot to sanitize the bottles and boil water in the canner to sanitize the lids. Just pour the boiling water into the jars to sanitize and pour it back out when you are ready to put green beans in the jars. Toss the lids into the canner when the water is boiling to sanitize them. Remove them after they are in for a few minutes.
In the large pot, boil water to add to the jars after the green beans have been added.
Use the directions for your pressure canner to add the correct amount of water to the canner. Mine calls for 3 quarts and has a fill line inside the pot. Bring the water to a boil.
Add green beans to the sanitized jars. Be sure to leave at least a 1/2 inch of head space. I usually just fill them up to the threaded part at the top of the jar. Add 1 tsp. of salt to each jar. Add boiling water to each jar. Again, only filling up to the threads.
Use a small rubber spatula to remove the air bubbles from the jars.
Wipe the jar rim of any water and salt. Any of this left on the rim could prevent a proper seal. Place a lid on each jar and tighten. Do not tighten too much at this point but tighten enough so that no water can seep through.
Place the jars into the pressure canner. Place the lid on the pressure canner and lock down. Use the 10 pound pressure weight for canning green beans unless you live in a high altitude. Once the weight starts to jiggle, cook for 25 minutes.
I won't give you complete directions on what to do for pressure canning because it is easier and safer to use the directions from your canner. The time and pressure weight is the information you need for green beans. For pressure canning, use the instructions from your canner.
When the timer goes off, your green beans are done. Let the pressure vent and take your jars out of the canner. I let them cool for at least 12 hours hours without moving them anywhere and tighten the lids down every few hours until they are cool and won't tighten any further.
My green beans turned out really well. My mom and I worked together to can diced tomatoes and green beans. It is much more fun and much easier with a buddy.
Canned Diced Tomatoes
The farmer's markets are swinging around here. With all of the unseasonable rain we have had this spring and summer, the crops are huge this year. It is pretty crazy. We have never had so much rain here all the way into July. Usually by this time in July, we are seeing 100* weather and our grass is so dry it has turned brown. We haven't even been under burn bans this year. Usually, we are under burn bans through most of June and July. One day, I will be able to have my own, very large vegetable garden. Until that day, I will be satisfied with locally grown farmer's market and organic produce. Last weekend we went to the farmer's market and bought fresh tomatoes, green beans, yellow squash and zucchini. I will write posts about how I processed/preserved each of them. For this post, I will give directions for canning diced tomatoes. This was my first time canning tomatoes. I am slowly learning to can different things. The tomatoes turned out really yummy. I plan on canning many more and making some other flavors of diced tomatoes.

Ingredients:
Fresh ripe tomatoes
Fresh lemons
Directions:
Core the tomatoes and gently score a small X, cutting just through the skin, on the bottom of each tomato. In a large pot, bring some water to boil. When the water is boiling, put the tomatoes in until the peel starts to peel up at the edges. Put the tomatoes in an ice bath to stop the cooking.
In your canner, start water boiling to sanitize the lids and jars. I sometimes use a tea kettle to boil water to sanitize the jars. In order to can, you must plan and multi-task or it will take you FOREVER.
While water is boiling and pieces are sanitizing, you can peel and dice the tomatoes. Put the cutting board inside a baking sheet with walls so you don't lose any of the juice while dicing tomatoes. You need the juice for your cans. This also makes clean up much easier. Discard the peels. I used a hand chopper to help with dicing the tomatoes. But you have to be careful with a hand chopper. If you chop too many times, you'll end up with mashed tomatoes or tomato sauce instead of diced tomatoes. Put your diced tomatoes with their juice in a large pot and bring to a low simmer. The directions I had said to boil for 30 minutes but I didn't cook it for quite so long. You can tell when to stop the boiling. The tomatoes start to foam and get very mushy. They will cook more during canning so you don't want to overcook them now.
While the tomatoes are simmering, juice the lemons. All of the instructions I have said to use citric acid or bottled lemon juice. But, citric acid that you just buy from the store, is usually made with corn ingredients. And I don't trust bottled lemon juice anymore either unless I know the source for sure. So I juiced the lemons myself. Juice several. It is better to have too much than not enough. You can always freeze the leftover lemon juice in ice cube trays to use later for marinades and juices.
Now, ladle the diced tomatoes into the sanitized jars leaving plenty of head space at the top of the jar. Add 1 Tbsp. of the fresh squeezed lemon juice to every jar of dice tomatoes. Use a small rubber spatula or chopstick to clear out the air bubbles and mix in the lemon juice. Tighten the lids and follow the directions for water bath canning in your canner. They should be in the canner for around 35 minutes.
After they are out of the canner, I usually tighten the lids every couple of hours for the rest of the day.
And here is a picture of my lovely canned diced tomatoes:
Roasted Coconut Sweet Potatoes
This is a yummy veggie side dish and it warms up well when left over. If you like sweet potato, you will love this. I am always looking for some healthy vegetable side dishes. My family is very picky when it comes to vegetables, although they are getting better. I have also improved in my tastes for vegetables in the recent few years. This is a dish I could eat regularly. I hope it is one that my daughter will eventually like to eat as well. L still doesn't eat a variety of foods since she got so sick two years ago but she seems to be interested again. She actually touches the food and asks what it is rather than screaming and running away. We are making progress in very small baby steps.
Ingredients:
2 Tbsp. coconut oil
2 lbs. (approximately) sweet potatoes, cut into 1 inch chunks
1/2 tsp. salt
1/4 tsp. black pepper
1 tsp. fresh squeezed lime juice or grated lime zest (optional but adds a nice zing)
Directions:
Preheat oven to 400*F. After the sweet potatoes are cut into chunks, put them in a large bowl. Melt the coconut oil in a small saucepan over medium heat. Pour the melted coconut oil over the sweet potatoes in the bowl. Sprinkle the salt and pepper. Toss the contents of the bowl to evenly coat potatoes in coconut oil. Spread the potatoes in a single layer on a large rimmed baking sheet. Roast, stirring every 10-15 minutes for a total of 40 minutes or until tender all the way through the sweet potato chunks. Toss with lime juice or zest, then serve.
I will come back and add pictures later. I have many pictures but I am gradually catching up for now.
This recipe came from HERE. I didn't alter it at all but I have cooked it different ways in different pans without any problems. Sometimes you don't have enough pans to cook everything at the same time.
Ingredients:
2 Tbsp. coconut oil
2 lbs. (approximately) sweet potatoes, cut into 1 inch chunks
1/2 tsp. salt
1/4 tsp. black pepper
1 tsp. fresh squeezed lime juice or grated lime zest (optional but adds a nice zing)
Directions:
Preheat oven to 400*F. After the sweet potatoes are cut into chunks, put them in a large bowl. Melt the coconut oil in a small saucepan over medium heat. Pour the melted coconut oil over the sweet potatoes in the bowl. Sprinkle the salt and pepper. Toss the contents of the bowl to evenly coat potatoes in coconut oil. Spread the potatoes in a single layer on a large rimmed baking sheet. Roast, stirring every 10-15 minutes for a total of 40 minutes or until tender all the way through the sweet potato chunks. Toss with lime juice or zest, then serve.
I will come back and add pictures later. I have many pictures but I am gradually catching up for now.
This recipe came from HERE. I didn't alter it at all but I have cooked it different ways in different pans without any problems. Sometimes you don't have enough pans to cook everything at the same time.
Tuesday, January 14, 2014
Italian Diced Tomatoes (So much better than the canned from the store)
I have used the canned version of this in past posts. That is, until I found out citric acid (which is in all canned tomatoes I've found so far) is often derived from corn. So, I decided that when tomatoes were in season, I would buy up as much as possible and make my own Italian diced tomatoes and can them. Well, so far I haven't found enough tomatoes to can any but I have made some for meals as I make them. Eventually, I will add canned notes to this blog. Until then, I will go ahead and give a recipe. Now there are not exact amounts on most of this. I just add ingredients a little at a time until it tastes excellent. I had taste testers who agreed, this sauce is amazing.
Ingredients:
Tomatoes
salt
pepper
garlic
onion (I prefer sweet onion)
olive or coconut oil (I've used both and both are good)
basil
oregano
(Note: This can be made with fresh or dried garlic, onion, basil and oregano.)
Directions:
Mince an onion and a clove or two of garlic (depending on your taste for garlic). Saute the onion and garlic in a little olive or coconut oil. While this is sauteing, dice up the tomatoes. I roughly chopped into chunks, then put them in my hand chopper to dice them really small. I have a Pampered Chef hand chopper. I use it to mince the garlic and onion too. It's wonderful for this type of stuff. When the garlic and onion is soft and transparent, add in the tomatoes. Now add salt and pepper and stir around on low/medium heat until warmed through. Add basil and oregano a little at a time until it suits your taste. You might want to add salt and pepper here too.
Trust me, this is amazing. Here is a picture of it used to top some chicken.


Another way to use this, get out your slow cooker.
Ingredients:
Italian Diced Tomatoes
4 Chicken Breasts
Directions:
In a slow cooker, add your chicken breasts. Top with plenty of Italian diced tomatoes. It should pretty much cover all chicken. Cook on low for 4 hours or high for 8 hours. Serve over rice.
Ingredients:
Tomatoes
salt
pepper
garlic
onion (I prefer sweet onion)
olive or coconut oil (I've used both and both are good)
basil
oregano
(Note: This can be made with fresh or dried garlic, onion, basil and oregano.)
Directions:
Mince an onion and a clove or two of garlic (depending on your taste for garlic). Saute the onion and garlic in a little olive or coconut oil. While this is sauteing, dice up the tomatoes. I roughly chopped into chunks, then put them in my hand chopper to dice them really small. I have a Pampered Chef hand chopper. I use it to mince the garlic and onion too. It's wonderful for this type of stuff. When the garlic and onion is soft and transparent, add in the tomatoes. Now add salt and pepper and stir around on low/medium heat until warmed through. Add basil and oregano a little at a time until it suits your taste. You might want to add salt and pepper here too.
Trust me, this is amazing. Here is a picture of it used to top some chicken.


Another way to use this, get out your slow cooker.
Ingredients:
Italian Diced Tomatoes
4 Chicken Breasts
Directions:
In a slow cooker, add your chicken breasts. Top with plenty of Italian diced tomatoes. It should pretty much cover all chicken. Cook on low for 4 hours or high for 8 hours. Serve over rice.
Hot Chocolate Mix
NOTE: I don't think this is corn free as is. I may look for a different recipe this winter.
This stuff is better than Swiss Miss ever thought of being! I made this recipe and it made four pint jars. I gave some away for Christmas gifts. Bonus points... No crazy ingredients!
Ingredients:
3 cups nonfat dry milk powder
2 cups powdered sugar
1½ cups cocoa powder
1½ cups white chocolate chips
¼ tsp. salt
Directions: Whisk together all ingredients and put through the food processor in batches. I used my smaller processor and it took three batches to get it all processed. It will depend on the size and capabilities of your food processor. The dry mix can be stored in an airtight container for up to three months.
To make hot chocolate, pour 1/3 cup of the cocoa mix in one cup of hot milk or water. Top with your preferred toppings. I usually don't top it with anything and it's really good.
Note: This is not my recipe. I found it at melskitchencafe.

This stuff is better than Swiss Miss ever thought of being! I made this recipe and it made four pint jars. I gave some away for Christmas gifts. Bonus points... No crazy ingredients!
Ingredients:
3 cups nonfat dry milk powder
2 cups powdered sugar
1½ cups cocoa powder
1½ cups white chocolate chips
¼ tsp. salt
Directions: Whisk together all ingredients and put through the food processor in batches. I used my smaller processor and it took three batches to get it all processed. It will depend on the size and capabilities of your food processor. The dry mix can be stored in an airtight container for up to three months.
To make hot chocolate, pour 1/3 cup of the cocoa mix in one cup of hot milk or water. Top with your preferred toppings. I usually don't top it with anything and it's really good.
Note: This is not my recipe. I found it at melskitchencafe.

Saturday, October 26, 2013
Pumpkin Spice Creamer
It has been awhile since I have been very active on my blog. Life has been hectic. Every week I think I will have time to blog but something comes up. I started a long term substitute position in a library in August. It has been so much fun and I get to stay until Christmas Break. Hopefully it will help me to get a full time position in my own classroom. At the same time I have been busy at home spending time with my three year old. Yes, I said THREE. I can't believe she is growing so fast. Also, the husband finally got to start working first shift, so he is actually home with us. We've been soaking up the family time. I have still been cooking and experimenting but it will take me awhile to catch up here. I will work on it but it may be during breaks that I have a surge in blog posts. For now, I have also discovered why people like coffee! I stopped drinking pop a few months ago. So I never get any caffeine unless I get a tea or coffee. At home, our tea is decaf and I never drink more than one coffee at a time. But, since I get up at 4 AM now in order to get to work (it's quite a commute for me at this point), I have a little trouble getting myself going. Especially now that the weather has gotten colder.
Anyway, I love the pumpkin spice lattes from Starbucks, but I hate the ingredients and price. I found several recipes online to make your own pumpkin spice creamer. I wasn't completely satisfied with any of them. I already make my own plain sweet creamer and I have already posted the recipe for that. I easily turned that into a pumpkin spice creamer. Here is how:
Ingredients:
1 can evaporated milk
1 can sweetened condensed milk
1 cup pureed pumpkin (canned or fresh)
1/2 tsp. pumpkin pie spice
Directions:
In a saucepan, heat 1/2 the can of evaporated milk, pumpkin and pumpkin pie spice to a low simmer. Whisk together until this comes to a simmer, then take it off of the heat. Let this cool completely. When it is cool, whisk in the rest of the evaporated milk and the sweetened condensed milk. Pour into two mason jars. This will stay good in the refrigerator for a week. I put one in the fridge to use and one in the freezer to save. You could also give one away for gifts OR you could keep one at home and one at work if you drink both places. It is very good. I believe I outdid Starbucks with this one.


Honey Garlic Pork Chops
I have been busy with my new temporary job and I have been trying to make meals that can be made quickly and easily. They also have to be good warmed up for lunches at work. We prefer to eat homemade foods rather than eating out or buying pre-made boxed foods. The easiest way for easy, quick, healthy, homemade meals is to use marinades. I have started making up bags with marinades and putting meat in them and freezing them. Then I can take it out of the freezer the night before, and it's ready the next night for cooking. This is one of the marinades we have been using for pork chops.
Ingredients:
Ingredients:
1/4 cup honey
1/2 cup apple juice
2 Tbsp. oil (I usually use grapeseed or olive)
1/2 cup apple juice
2 Tbsp. oil (I usually use grapeseed or olive)
3 Tbsp. coconut aminos (This is what we use to replace soy sauce.)
6 garlic cloves, minced
4 pork chops (I use boneless. I hate eating around bones.)
Directions:
In a ziploc bag, add all ingredients and close and mix around. Let marinade for at least 2 hours. Once marinated, grill or bake. We grilled and loved them. But if you can't grill, bake in a preheated oven for 35 minutes at 350 degrees.
I got this recipe from Pinterest and just replaced the soy sauce. To see the original post, look here.
Thursday, June 27, 2013
Sesame Coconut Chicken
This is a new favorite. It is easy to make and tastes like Chinese takeout except it's better for you. I got the original recipe from the Paleoaholic website. There are some great recipes there and the paleo diet lends itself well to allergen friendly diets like ours. I modified the recipe a little but you can find the original recipe HERE. J and I loved it. This also helped us discover a replacement to soy sauce. J loves soy sauce and recipes that use it but I've never liked soy sauce much and I stay away from soy due to hormone imbalances. I also prefer to keep L away from soy since hormone problems run in the family and most soy is now GMO. She also seems to have more stomach issues when soy oils are used on anything she eats. Such a sensitive digestive system our toddler has.
Ingredients:
4 boneless, skinless chicken breasts
2 garlic cloves, minced
1-2 Tbsp. onion, minced
1 tsp. ginger (fresh grated or powdered/dried works)
3 Tbsp. coconut aminos (soy sauce replacement, you should be able to find this at any health food store)
1 Tbsp. sesame oil (I was actually out of sesame oil and used olive here. It worked just fine so don't worry if you don't have sesame on hand)
1/2 cup apple juice (make sure it is a pure apple juice)
Directions:
In a large bowl, mix together garlic, onion, ginger, aminos, oil and apple juice. Add the chicken in the bowl and toss to coat. Let marinate. Mine marinated for a couple of hours but it should marinate for at least 30 minutes.
Preheat oven to 425*F. Cover a baking sheet with foil and place chicken on the pan. Spoon a little bit of the marinade over the chicken and set aside. Bake the chicken for about 20 minutes. Turn chicken and spoon a little more marinade over the other side. Bake for another 20-25 minutes.
I served this over rice and cooked the rice with a little bit of the apple juice, ginger and coconut aminos mixed in as well. It was VERY good. It will be added to our regular list of meals because it was easy and tasted so good.

Ingredients:
4 boneless, skinless chicken breasts
2 garlic cloves, minced
1-2 Tbsp. onion, minced
1 tsp. ginger (fresh grated or powdered/dried works)
3 Tbsp. coconut aminos (soy sauce replacement, you should be able to find this at any health food store)
1 Tbsp. sesame oil (I was actually out of sesame oil and used olive here. It worked just fine so don't worry if you don't have sesame on hand)
1/2 cup apple juice (make sure it is a pure apple juice)
Directions:
In a large bowl, mix together garlic, onion, ginger, aminos, oil and apple juice. Add the chicken in the bowl and toss to coat. Let marinate. Mine marinated for a couple of hours but it should marinate for at least 30 minutes.
Preheat oven to 425*F. Cover a baking sheet with foil and place chicken on the pan. Spoon a little bit of the marinade over the chicken and set aside. Bake the chicken for about 20 minutes. Turn chicken and spoon a little more marinade over the other side. Bake for another 20-25 minutes.
I served this over rice and cooked the rice with a little bit of the apple juice, ginger and coconut aminos mixed in as well. It was VERY good. It will be added to our regular list of meals because it was easy and tasted so good.

Wednesday, June 19, 2013
Quinoa Crusted Chicken
I completely stole this recipe. You can find the original recipe HERE on a blog called The Simple Dish. I must give credit here. It's a very good recipe. I was impressed.
Ingredients:
4 chicken breasts
1 cup uncooked quinoa
1 egg
salt
pepper
olive oil
1 tsp. garlic powder
1 Tbsp. onion powder
1 Tbsp. parsley
Directions:
Boil quinoa in 2 cups of water. While the quinoa is cooking, I took the chicken breasts and used a mallet to make them thinner. When the quinoa was finished, I put it in a separate bowl and mixed in the salt, pepper, garlic, onion and parsley. In a separate bowl, scramble the egg for dipping the chicken. Prepare a baking sheet with olive oil. I have a Misto sprayer to spray the olive oil and keep the chicken from sticking. Preheat the oven to 375*F. Dip each chicken breast in the egg, then coat in the quinoa mixture. Lay out on the baking sheet and bake for approximately 45 minutes.

Ingredients:
4 chicken breasts
1 cup uncooked quinoa
1 egg
salt
pepper
olive oil
1 tsp. garlic powder
1 Tbsp. onion powder
1 Tbsp. parsley
Directions:
Boil quinoa in 2 cups of water. While the quinoa is cooking, I took the chicken breasts and used a mallet to make them thinner. When the quinoa was finished, I put it in a separate bowl and mixed in the salt, pepper, garlic, onion and parsley. In a separate bowl, scramble the egg for dipping the chicken. Prepare a baking sheet with olive oil. I have a Misto sprayer to spray the olive oil and keep the chicken from sticking. Preheat the oven to 375*F. Dip each chicken breast in the egg, then coat in the quinoa mixture. Lay out on the baking sheet and bake for approximately 45 minutes.

Chicken Stuffed Sweet Potatoes
I've seen several recipes of stuffed sweet potatoes, especially since the paleo diet has become so popular. This is actually my own recipe. I read several recipes and kind of mixed them as I though my family would like. This is a recipe for two servings. If you have more people in you family, just add a sweet potato, chicken breast and two slices of bacon per person.
Ingredients:
2 sweet potatoes
2 chicken breasts (diced)
4 slices bacon
parmesan (or preferred) cheese (optional) (I think this would be really good with something like goat cheese as well)
coconut or olive oil (unless cooking chicken in bacon grease)
Directions:
Now I already had bacon cooked so I chopped up and reheated it. We keep our nitrate free bacon cooked and ready to warm up for the toddler. She loves and can actually eat this one type of bacon so we keep it around. If you are cooking the bacon, just use the bacon grease to cook the diced chicken in. If not, use the olive or coconut oil. First, you will need to bake the sweet potatoes. This takes at least an hour in my oven so those will cook for 30 minutes before you even have to start on the rest. Then cook the bacon. Then saute the diced chicken in the bacon grease or oil. When the potatoes are done, split them in half, unless you baked them that way. Hollow out the middle a little, pushing the inside of the potato to the edges. Split the chicken and bacon evenly into the hollowed out centers of the sweet potatoes. Top with parmesan cheese. I topped with parmesan from a jar. I'm sure it would be better with fresh but I get so few shortcuts anymore that I take advantage of the few I can.
Ingredients:
2 sweet potatoes
2 chicken breasts (diced)
4 slices bacon
parmesan (or preferred) cheese (optional) (I think this would be really good with something like goat cheese as well)
coconut or olive oil (unless cooking chicken in bacon grease)
Directions:
Now I already had bacon cooked so I chopped up and reheated it. We keep our nitrate free bacon cooked and ready to warm up for the toddler. She loves and can actually eat this one type of bacon so we keep it around. If you are cooking the bacon, just use the bacon grease to cook the diced chicken in. If not, use the olive or coconut oil. First, you will need to bake the sweet potatoes. This takes at least an hour in my oven so those will cook for 30 minutes before you even have to start on the rest. Then cook the bacon. Then saute the diced chicken in the bacon grease or oil. When the potatoes are done, split them in half, unless you baked them that way. Hollow out the middle a little, pushing the inside of the potato to the edges. Split the chicken and bacon evenly into the hollowed out centers of the sweet potatoes. Top with parmesan cheese. I topped with parmesan from a jar. I'm sure it would be better with fresh but I get so few shortcuts anymore that I take advantage of the few I can.


Watermelon Juice
This is how I used watermelon that needed to be eaten. It is hard to get rid of watermelon when you are the only one in the house who will eat it.
Ingredients:
Watermelon chunks
1/2-3/4 cup sugar
1/2 cup lime juice
Water
Directions:
Blend watermelon chunks and strain to remove seeds. Add lime juice and sugar. Stir in water to fill the pitcher. Stir or shake up before pouring anytime because the watermelon will settle to the bottom. It's pretty good. Try it.


Ingredients:
Watermelon chunks
1/2-3/4 cup sugar
1/2 cup lime juice
Water
Directions:
Blend watermelon chunks and strain to remove seeds. Add lime juice and sugar. Stir in water to fill the pitcher. Stir or shake up before pouring anytime because the watermelon will settle to the bottom. It's pretty good. Try it.


Tuesday, April 2, 2013
Canned Applesauce
With all of the digestive issues in this family, we have pretty much stopped processed food all together. This includes jars and cans from the store which most people still use for convenience. It is difficult to cook completely from scratch this way in this society based so much on convenience and constant go go go. We, like many families, are often on the go but we have decided to make health a priority so that we can keep going going going. This means I even can my own food. I've done a few posts on freezing and I still do that quite often. But now, I can too. This is very new to me. I know my great grandparents canned their own food from their own garden. We don't have the space or time for a garden yet though that is the ultimate goal. For now, I will stock up when the farmer's market has a good selection and when I find organic produce on sale at the grocery stores. So far, I have only canned applesauce. But it is so good! I bought this great little pressure cooker which also doubles as a water bath cooker. The applesauce was done in a water bath and here are the instructions:
Ingredients and Materials:
Large pot for cooking apples
Peeler/Corer or good knife
Water bath canner
A big bunch of apples
Water
Directions:
Peel and core apples. Place the apple slices in a large pot with about an inch of water in the bottom. (More or less water depending on the size of the pot and amount of apples.) Cook apples on the stove and stir until all apple slices are tender. Mash with a potato masher. I'm sure you could also process in a food processor or something similar if you want a finer texture applesauce. Spoon the applesauce into pint canning jars. You should taste it now. I used really great granny smith apples and they were great just like this. But, depending on the type of apple, you may want to add a little sugar. You want to add the sugar and cinnamon or other optional ingredients before you spoon into jars. After the jars are full and closed, submerge them in the water bath with about an inch of water above the jars. Boil in the water bath for about twenty minutes. NOTE: If you live in a higher altitude, you will need to boil longer.
After twenty minutes, pull the cans out carefully and let them cool completely before storing. I set out a couple of kitchen towels and set the jars on them to cool. They need about 12 hours to cool before storage.
(Pictures to come later. I have a new computer and I'm still getting things switched around.)
Ingredients and Materials:
Large pot for cooking apples
Peeler/Corer or good knife
Water bath canner
A big bunch of apples
Water
Directions:
Peel and core apples. Place the apple slices in a large pot with about an inch of water in the bottom. (More or less water depending on the size of the pot and amount of apples.) Cook apples on the stove and stir until all apple slices are tender. Mash with a potato masher. I'm sure you could also process in a food processor or something similar if you want a finer texture applesauce. Spoon the applesauce into pint canning jars. You should taste it now. I used really great granny smith apples and they were great just like this. But, depending on the type of apple, you may want to add a little sugar. You want to add the sugar and cinnamon or other optional ingredients before you spoon into jars. After the jars are full and closed, submerge them in the water bath with about an inch of water above the jars. Boil in the water bath for about twenty minutes. NOTE: If you live in a higher altitude, you will need to boil longer.
After twenty minutes, pull the cans out carefully and let them cool completely before storing. I set out a couple of kitchen towels and set the jars on them to cool. They need about 12 hours to cool before storage.
(Pictures to come later. I have a new computer and I'm still getting things switched around.)
Friday, January 4, 2013
Rice
It seems silly to put a recipe for regular ol' rice on here but my group is very picky and I've finally perfected my method so that we can all eat rice. So here is my method and recipe for the rest of you. Maybe it will help some who also have to please picky eaters.
Ingredients:
1 cup rice (I prefer Basmati but this will work for any rice. I've used several.)
1 Tbsp. onion powder
3 cups water
salt and pepper
Directions:
In an appropriate sized pot, stir together all ingredients and bring to a boil. Reduce to a low boil/high simmer until most liquid is gone. Serve.
Ingredients:
1 cup rice (I prefer Basmati but this will work for any rice. I've used several.)
1 Tbsp. onion powder
3 cups water
salt and pepper
Directions:
In an appropriate sized pot, stir together all ingredients and bring to a boil. Reduce to a low boil/high simmer until most liquid is gone. Serve.
Tuesday, December 11, 2012
Easy Tomato Soup
I've been sick a lot lately. I can't get over one thing before the next hits. My immune system has taken a big hit this year due to severe allergies and the first year being in the schools so much. Everyone tells me that every new teacher is sick the first year while their bodies build up immunity to everything that all of the students, families and coworkers bring in. I rarely got sick when I worked in an office of ten people but now I'm in multiple schools with hundreds of people in each school. Anyway, I've had to find some foods that are easy to make and easy on the stomach. I really needed a soup but I hate eating canned soup. Have you read the labels on those things? There are some crazy ingredients in those little cans. And I have recipes for big soups but they take longer to cook and prepare. I was sick enough a few times that I couldn't stand for more than a few minutes without getting sick again. So, I found this soup and modified it to my own taste. It uses canned tomato sauce which has fewer ingredients. You could, of course, use homemade tomato sauce which I hope to have plenty of in a few years when I am able to get my garden really going. But right now, the tomatoes at the store are horrible. I also typically try to use canned foods with low sodium or no added sodium but I don't on the tomato sauce. The low sodium tomato sauce has other unnecessary ingredients, one of which is a corn product.
Ingredients:
½ tsp. onion powder
1 Tbsp. butter
1 cup tomato sauce (no cans for corn free)
¼ tsp. dried basil
Pinch of dried thyme
Pinch ground black pepper
1 cup chicken stock
Handful of parmesan cheese (optional)
Saltines (optional)
Directions:
In a small saucepan, mix tomato sauce, butter, chicken stock, herbs and spices. Bring to a simmer. When soup is warm through turn off the heat and add the parmesan if desired. Serve warm with saltines.
Ingredients:
½ tsp. onion powder
1 Tbsp. butter
1 cup tomato sauce (no cans for corn free)
¼ tsp. dried basil
Pinch of dried thyme
Pinch ground black pepper
1 cup chicken stock
Handful of parmesan cheese (optional)
Saltines (optional)
Directions:
In a small saucepan, mix tomato sauce, butter, chicken stock, herbs and spices. Bring to a simmer. When soup is warm through turn off the heat and add the parmesan if desired. Serve warm with saltines.
Subscribe to:
Posts (Atom)