Here is the recipe for the lotion I promised after the lotion bars. My mother in law loves this. She has circulation problems in her legs and they itch and break out. This lotion has helped it heal when nothing else has. I never thought about that when I made it but I'm ecstatic that it helped her so much. I hope it can help more people too.
Ingredients:
1/2 cup almond oil (if you need to be nut free you can use olive or grapeseed)
1/4 cup coconut oil
1/8 cup beeswax
1/2 tsp. vitamin E oil
30 drops essential oil (optional)
Directions:
Add all ingredients to a mason jar. Add 1-2 inches of water in a sauce pan and put on medium heat. Put the jar in the sauce pan and shake the ingredients periodically while melting. When everything is melted and mixed, pour into containers. I used some squeeze bottles for this lotion. It seems to be thin enough to use in a pump but I have not tried it that way yet. If you put it in a jar or container that can't be squeezed, you may need to stir it up after it cools.
I made this for Christmas presents. I will update later when I know how everyone liked it. I like it so far. I've been using coconut oil on my hands and body for awhile but it is a pain to melt every time you need to use it. This way I can put it in a container and it is ready to use. It is a little greasy, but I've never found a lotion I thought wasn't greasy or oily. I have had the best luck squeezing it out onto the back of my hand, then spreading it around so the majority of the oil is on the back of my hand. If my palms and fingers feel to oily, I usually just grab a dry rag or towel (or if I'm out- a paper towel) and wipe off my palms. I have really bad excema that flairs up worse in the winter. My hands will crack and bleed. And no lotion works. In fact, most of them burn, break me out, or make the excema worse. Even the prescription ointments I was given didn't work. I also have patches on my arms and legs. I'm lucky that I don't get them on my face like some people I know. But if you or someone you know has trouble with skin issues or allergies to topical products, this may help them.
I did not come up with this recipe myself, of course. I did, however, edit the ones I found until it worked for me. I had four different lotion recipes that I used to change things around until it came out the way I wanted.
I will add pictures next time I make this. I focused on pictures of the lotion bars and completely forgot about them by the time I did this lotion.
Tuesday, January 14, 2014

Coconut Lotion Bars
I was recently (finally) diagnosed with excema. Although I've ALWAYS known I had it. I'm allergic to every lotion out there. My breakouts get worse in the winter of course and I get patches up my arms and around my thighs. And the backs of my hands crack and bleed. But lotion breaks me out and burns like my hands are on fire. And they turn really, really, REALLY red. And it is all getting worse with age. So this year I decided to do something about it and make my own lotion. I even shared the experience and made several bars for family at Christmas. So far everyone has liked my lotions. I made liquid lotion too and I'll post the instructions for that later. This though, is for the bar. I like it the best. But the other lotion is better for using with the child.
Ingredients:
1/2 cup coconut oil
1/2 cup Shea butter (if you need to make this nut free, I believe you could substitute cocoa butter)
2/3 cup beeswax pastilles
1/2 tsp. vitamin E oil
20-30 drops essential oils (optional for scent)
Directions:
Combine ingredients in a quart size mason jar (with lid to prevent water from damaging lotion bar mixture). Fill a sauce pan with about two inches of water and place over medium to medium-high heat. Bring the water to a simmer and shake up the jar periodically while the contents melt. When everything is liquid, pour into molds. I had plastic soap-making molds. You could use silicon molds, especially if you like them enough to make them more than once. It is hard to pop these out of glass or metal molds/pans. Let molds set overnight. Carefully pop out of molds. I wrapped them in cellophane to give as gifts at Christmas. I also kept some for myself. These are great to use after showers, shaving and washing dishes.
If these get a little to soft or start melting, you can harden it back up by sticking it in the fridge for awhile. The cold temperatures will harden the coconut oil and Shea butter.


I did not come up with this recipe at all so I need to give credit. I, of course, found it on pinterest. You can find the original post where I got the recipe HERE.
Ingredients:
1/2 cup coconut oil
1/2 cup Shea butter (if you need to make this nut free, I believe you could substitute cocoa butter)
2/3 cup beeswax pastilles
1/2 tsp. vitamin E oil
20-30 drops essential oils (optional for scent)
Directions:
Combine ingredients in a quart size mason jar (with lid to prevent water from damaging lotion bar mixture). Fill a sauce pan with about two inches of water and place over medium to medium-high heat. Bring the water to a simmer and shake up the jar periodically while the contents melt. When everything is liquid, pour into molds. I had plastic soap-making molds. You could use silicon molds, especially if you like them enough to make them more than once. It is hard to pop these out of glass or metal molds/pans. Let molds set overnight. Carefully pop out of molds. I wrapped them in cellophane to give as gifts at Christmas. I also kept some for myself. These are great to use after showers, shaving and washing dishes.
If these get a little to soft or start melting, you can harden it back up by sticking it in the fridge for awhile. The cold temperatures will harden the coconut oil and Shea butter.


I did not come up with this recipe at all so I need to give credit. I, of course, found it on pinterest. You can find the original post where I got the recipe HERE.
Snowman Ornaments
These ornaments were so so easy. And I had all of the supplies around the house. If you don't have all of the supplies, they are cheap at your local craft store.
Supplies:
Hot glue
Orange pipe cleaners
Small black beads
Wax paper
Twine
Instructions:
Pour hot glue in spots on the wax paper with the twine looped underneath. The twine is to hold the ornaments on the tree. While it's still hot, trim small pieces of orange pipe cleaner for the carrot noses and carefully insert the small beads for eyes and mouth. Let dry and carefully pull from the paper. I added the ornaments to gifts for decoration. Then they could be hung on the tree.

Note: Again, this was not my idea. Pinterest is a wonderful place. You can find the original blog (or at least the blog I used) HERE.
Supplies:
Hot glue
Orange pipe cleaners
Small black beads
Wax paper
Twine
Instructions:
Pour hot glue in spots on the wax paper with the twine looped underneath. The twine is to hold the ornaments on the tree. While it's still hot, trim small pieces of orange pipe cleaner for the carrot noses and carefully insert the small beads for eyes and mouth. Let dry and carefully pull from the paper. I added the ornaments to gifts for decoration. Then they could be hung on the tree.

Note: Again, this was not my idea. Pinterest is a wonderful place. You can find the original blog (or at least the blog I used) HERE.
Hex Nut Necklace/Bracelet
I made these for the boys in the family. A necklace for my nephew and husband, a bracelet for myself and a key chain for my sister's boyfriend of many years. My nephew loved it. It's masculine enough for the boys and men.

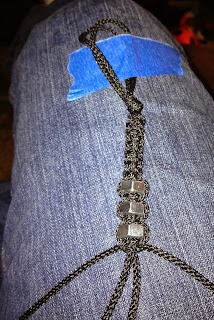

Note: This project was not my original idea. As usual. You can find the blog I used HERE.


Note: This project was not my original idea. As usual. You can find the blog I used HERE.
Italian Diced Tomatoes (So much better than the canned from the store)
I have used the canned version of this in past posts. That is, until I found out citric acid (which is in all canned tomatoes I've found so far) is often derived from corn. So, I decided that when tomatoes were in season, I would buy up as much as possible and make my own Italian diced tomatoes and can them. Well, so far I haven't found enough tomatoes to can any but I have made some for meals as I make them. Eventually, I will add canned notes to this blog. Until then, I will go ahead and give a recipe. Now there are not exact amounts on most of this. I just add ingredients a little at a time until it tastes excellent. I had taste testers who agreed, this sauce is amazing.
Ingredients:
Tomatoes
salt
pepper
garlic
onion (I prefer sweet onion)
olive or coconut oil (I've used both and both are good)
basil
oregano
(Note: This can be made with fresh or dried garlic, onion, basil and oregano.)
Directions:
Mince an onion and a clove or two of garlic (depending on your taste for garlic). Saute the onion and garlic in a little olive or coconut oil. While this is sauteing, dice up the tomatoes. I roughly chopped into chunks, then put them in my hand chopper to dice them really small. I have a Pampered Chef hand chopper. I use it to mince the garlic and onion too. It's wonderful for this type of stuff. When the garlic and onion is soft and transparent, add in the tomatoes. Now add salt and pepper and stir around on low/medium heat until warmed through. Add basil and oregano a little at a time until it suits your taste. You might want to add salt and pepper here too.
Trust me, this is amazing. Here is a picture of it used to top some chicken.


Another way to use this, get out your slow cooker.
Ingredients:
Italian Diced Tomatoes
4 Chicken Breasts
Directions:
In a slow cooker, add your chicken breasts. Top with plenty of Italian diced tomatoes. It should pretty much cover all chicken. Cook on low for 4 hours or high for 8 hours. Serve over rice.
Ingredients:
Tomatoes
salt
pepper
garlic
onion (I prefer sweet onion)
olive or coconut oil (I've used both and both are good)
basil
oregano
(Note: This can be made with fresh or dried garlic, onion, basil and oregano.)
Directions:
Mince an onion and a clove or two of garlic (depending on your taste for garlic). Saute the onion and garlic in a little olive or coconut oil. While this is sauteing, dice up the tomatoes. I roughly chopped into chunks, then put them in my hand chopper to dice them really small. I have a Pampered Chef hand chopper. I use it to mince the garlic and onion too. It's wonderful for this type of stuff. When the garlic and onion is soft and transparent, add in the tomatoes. Now add salt and pepper and stir around on low/medium heat until warmed through. Add basil and oregano a little at a time until it suits your taste. You might want to add salt and pepper here too.
Trust me, this is amazing. Here is a picture of it used to top some chicken.


Another way to use this, get out your slow cooker.
Ingredients:
Italian Diced Tomatoes
4 Chicken Breasts
Directions:
In a slow cooker, add your chicken breasts. Top with plenty of Italian diced tomatoes. It should pretty much cover all chicken. Cook on low for 4 hours or high for 8 hours. Serve over rice.
DIY Washer Necklaces
These went over really well. I made them for all of my nieces, my mom, my mother-in-law, my sister, my best friend and myself. Most people put it on immediately.
Supplies:
Washers
Scrapbook paper
Mod podge
Trimming knife
Sponge brushes
Scissors
Glossy accents
Cord/string/chain
Beads


Note: I don't have any one blog/website to credit with this. I did not come up with these but there are multiple sources across Pinterest and the blogosphere.
Supplies:
Washers
Scrapbook paper
Mod podge
Trimming knife
Sponge brushes
Scissors
Glossy accents
Cord/string/chain
Beads

Instructions:
Trim scrapbook paper to fit on the washer. Spread mod podge on the washer and smooth the scrapbook paper on the washer. Trim any excess paper from the washer using the trimming knife. Dab the glossy accents on the washer. A little goes a long way. Spread it in the middle because it will spread to the edges some on its own. It takes a long time for this to dry. It depends partly on the weather and partly on how much glossy accents you put on. It took mine at least 24 hours to completely dry. Once they are completely dry, you can turn them over and do the same thing to the other side. After both sides are dry, wrap the cord around and string the bead. You now have a washer necklace. I tied them with adjustable knots so that no matter who wears them, they can adjust the length of the necklace.


Note: I don't have any one blog/website to credit with this. I did not come up with these but there are multiple sources across Pinterest and the blogosphere.
Hot Chocolate Mix
NOTE: I don't think this is corn free as is. I may look for a different recipe this winter.
This stuff is better than Swiss Miss ever thought of being! I made this recipe and it made four pint jars. I gave some away for Christmas gifts. Bonus points... No crazy ingredients!
Ingredients:
3 cups nonfat dry milk powder
2 cups powdered sugar
1½ cups cocoa powder
1½ cups white chocolate chips
¼ tsp. salt
Directions: Whisk together all ingredients and put through the food processor in batches. I used my smaller processor and it took three batches to get it all processed. It will depend on the size and capabilities of your food processor. The dry mix can be stored in an airtight container for up to three months.
To make hot chocolate, pour 1/3 cup of the cocoa mix in one cup of hot milk or water. Top with your preferred toppings. I usually don't top it with anything and it's really good.
Note: This is not my recipe. I found it at melskitchencafe.

This stuff is better than Swiss Miss ever thought of being! I made this recipe and it made four pint jars. I gave some away for Christmas gifts. Bonus points... No crazy ingredients!
Ingredients:
3 cups nonfat dry milk powder
2 cups powdered sugar
1½ cups cocoa powder
1½ cups white chocolate chips
¼ tsp. salt
Directions: Whisk together all ingredients and put through the food processor in batches. I used my smaller processor and it took three batches to get it all processed. It will depend on the size and capabilities of your food processor. The dry mix can be stored in an airtight container for up to three months.
To make hot chocolate, pour 1/3 cup of the cocoa mix in one cup of hot milk or water. Top with your preferred toppings. I usually don't top it with anything and it's really good.
Note: This is not my recipe. I found it at melskitchencafe.

Subscribe to:
Posts (Atom)